From our sponsor: Leverage AI for dynamic, custom website builds with ease.
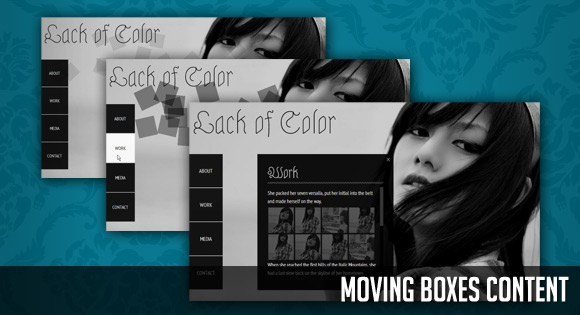
Today we will create a website template with some really sweet animations using jQuery. The idea is to have little boxes scattered around at the top of the site and when a menu item is clicked, the boxes animate to form the main content area. We will use some different animation effects that we will add as options to the menu item.
The content area will custom scroll for which we will be using the really awesome jScrollPane Plugin by Kevin Luck. We will also use the jQuery 2d transformation plugin by Grady in order to rotate the little boxes while we animate them, and the the jQuery Easing Plugin for some spice.
The beautiful photos are by Jin. Visit his Flickr photostream at http://www.flickr.com/photos/jinthai/
So, let’s start!
The Markup
First, we want to place the background image with the grid overlay:
<div id="mb_background" class="mb_background">
	<img class="mb_bgimage" src="images/default.jpg" alt="Background"/>
	<div class="mb_overlay"></div>
</div>
The next div element will be used to add the little boxes with their random position and rotation degree
<div id="mb_pattern" class="mb_pattern"></div>
We will place a total of 16 boxes (div elements) into this container.
The menu and the heading will have the following HTML stucture:
<div class="mb_heading">
	<h1>Lack of Color</h1>
</div>

<div id="mb_menu" class="mb_menu">
	<a href="#" data-speed="600" data-easing="easeOutBack">About</a>
	<a href="#" data-speed="1000" data-easing="easeInExpo">Work</a>
	<a href="#" data-speed="600" data-easing="easeOutBack">Media</a>
	<a href="#" data-speed="1000" data-easing="easeInExpo">Contact</a>
</div>
As you can see, we will add two “data-” attributes that we’ll use to define the speed and the easing effect that will be associated to the animation of the boxes. Read more about these new custom data attributes of HTML5 on John Resig’s blog: HTML 5 data- Attributes
Next, we will define the structure for the content area. There will be a main wrapper with the class “mb_content_wrapper” which contains all the content containers that have the class “mb_content” and a span for the closing cross:
<div id="mb_content_wrapper" class="mb_content_wrapper">
	<span class="mb_close"></span>
	<div class="mb_content">
		<h2>About</h2>
		<div class="mb_content_inner">
			<p>Some text...</p>
		</div>
	</div>
	<div class="mb_content">
		...
	</div>
	<div class="mb_content">
		...
	</div>
	<div class="mb_content">
		...
	</div>
</div>
One of the content elements is going to contain a list of images:
<div class="mb_content_inner">
	<p>...</p>
	<ul id="mb_imagelist" class="mb_imagelist">
		<li><img src="images/small/1.jpg" alt="image1" data-bgimg="images/image1.jpg"/></li>
		<li><img src="images/small/2.jpg" alt="image2" data-bgimg="images/image2.jpg"/></li>
		<li>...</li>
	</ul>
	<p>...</p>
</div>
And that’s all the HTML. Now, let’s make it pretty!
The CSS
First, we will embed our reset.css that will reset all the basic styles, and we’ll define some main properties:
@import url('reset.css');

body{
	background:#000;
	color:#fff;
	font-family: 'PT Sans Narrow', Arial, sans-serif;
}
a{
	color:#fff;
	text-decoration:none;
}
Next, we will define the styles for the image that we will use as a background and the overlay pattern:
img.mb_bgimage{
	position:fixed;
	left:0px;
	top:0px;
	width:100%;
	opacity:0.8;
	z-index:1;
}
.mb_overlay{
	width:100%;
	height:100%;
	position:fixed;
	top:0px;
	left:0px;
	background:transparent url(../images/pattern.png) repeat top left;
	z-index:2;
}
They will both be of fixed positioning and we will give them a low z-index so that they really stay under everything else.
The little boxes will all have a height and width of 50 pixel and they will have absolute positioning:
.mb_pattern div{
	position:absolute;
	width:50px;
	height:50px;
	background:#000;
	z-index:10;
}
The main heading will also be positioned absolutely and we will use a font-face from the collection of Google Web Fonts:
.mb_heading h1{
	position:absolute;
	top:10px;
	left:10px;
	font-size:86px;
	color:#000;
	text-shadow:0px 0px 1px #fff;
	font-family:"Astloch", Arial, sans-serif;
	z-index:4;
}
The menu container will be placed absolutely to the left side of the screen:
.mb_menu{
	position:absolute;
	top:154px;
	left:0px;
	z-index:11;
}
The link elements inside of the menu container will be black boxes with a neat transition on hover:
.mb_menu a{
	background-color:#000;
	margin-bottom:2px;
	opacity:0.9;
	display:block;
	width:98px;
	height:98px;
	color:#fff;
	line-height:98px;
	text-align:center;
	text-transform:uppercase;
	outline:none;
	-webkit-transition: all 0.2s ease-in;
	-moz-transition:all 0.2s ease-in;
	-o-transition: all 0.2s ease-in;
	-transition: all 0.2s ease-in;
}
.mb_menu a:hover{
	color:#000;
	background-color:#fff;
}
Read more about transitions in the W3 working draft at http://www.w3.org/TR/css3-transitions/ or in this great article on A List Apart by Dan Cederholm: Understanding CSS3 Transitions.
Next step is to style the content wrapper. We will give it a fixed width and height and a semi-transparent dark background. We’ll hide it initially:
.mb_content_wrapper{
	background:transparent url(../images/bg_menu.png) repeat top left;
	width:400px;
	height:400px;
	position:absolute;
	top:154px;
	left:200px;
	z-index:4;
	display:none;
}
Why don’t we just use opacity instead of a repeated background image? In some browsers all child elements will inherit that opacity level and we cannot set it higher for them. So, if we really want the inner elements to be completely opaque, it’s safer to use a background image for the surrounding container.
The little closing span will have the following style:
span.mb_close{
	position:absolute;
	top:10px;
	right:10px;
	width:11px;
	height:12px;
	cursor:pointer;
	background:transparent url(../images/close.png) no-repeat top left;
	opacity:0.8;
}
span.mb_close:hover{
	opacity:1.0;
}
The content area is going to have some padding and we’ll hide it:
.mb_content{
	padding:30px;
	display:none;
}
The heading will have some background image for the stripe underline:
.mb_content h2{
	font-family:"Astloch";
	text-shadow:0px 0px 1px #fff;
	font-size:42px;
	background:transparent url(../images/line.png) repeat-x bottom left;
	padding:0px 0px 5px 0px;
	margin-bottom:10px;
}
The following container is for the resting content and it will be this element that we will apply the custom scrollbar to:
.mb_content_inner{
	line-height:24px;
	height:268px;
	outline: none;
}
.mb_content_inner p{
	padding:5px 0px;
}
For the thumbnail list in the “Work” section, we will have the following style:
ul.mb_imagelist li{
	float:left;
	margin:2px;
	cursor:pointer;
}
ul.mb_imagelist li img{
	display:block;
	opacity:0.3;
	-webkit-transition: all 0.5s ease-in-out;
	-moz-transition: all 0.5s ease-in-out;
	-o-transition: all 0.5s ease-in-out;
	-transition: all 0.5s ease-in-out;
}
ul.mb_imagelist li img:hover{
	opacity:1.0;
}
As you can see, we will add some transition to it, making the thumbnail become opaque smoothly.
And that’s all the main style. (You can check out the styling for the form and the footer in the style.css file.)
Let’s add some brio to the whole thing!
The JavaScript
So the main idea is to create those little boxes and scatter them around a restricted area and rotate them. When we click on a menu item, we’ll make those boxes animate to a certain position and form the main content container. Then we’ll show the container and the respective content. When clicking on the closing span, we want to make the boxes disperse again.
In the “Works” content, we will have some thumbnails that will show a background image when clicking on them.
So, let’s start by caching some elements:
var $menu				= $('#mb_menu'),
	$menuItems			= $menu.children('a'),
	$mbWrapper			= $('#mb_content_wrapper'),
	$mbClose			= $mbWrapper.children('.mb_close'),
	$mbContentItems		= $mbWrapper.children('.mb_content'),
	$mbContentInnerItems= $mbContentItems.children('.mb_content_inner');
	$mbPattern			= $('#mb_pattern'),
	$works				= $('#mb_imagelist > li'),
	$mb_bgimage			= $('#mb_background > img'),
Next, we will define the “Menu” function:
Menu		 		= (function(){
  ...
})();

/*
call the init method of Menu
 */
Menu.init();
So, inside of our “Menu” function, we’ll define our main functionality, starting with a method to initialize the whole thing:
var init			= function() {
	preloadImages();
	initPlugins();
	initPattern();
	initEventsHandler();
},
We want to preload the images that we have in the “Work” content. The data attribute in the thumbnails tells us, which images we need:
preloadImages = function() {
$works.each(function(i) {
$('![]() ').attr('src' , $(this).children('img').data('bgimg'));
});
},
').attr('src' , $(this).children('img').data('bgimg'));
});
},
The jScollPane plugin needs to be initialized, and we’ll apply the custom scroll to the inner content area of the content div when we call this:
initPlugins			= function() {
	$mbContentInnerItems.jScrollPane({
		verticalDragMinHeight: 40,
		verticalDragMaxHeight: 40
	});
},
“initPattern” will randomly place 16 boxes (div elements) into a restricted area. We restrict that area by restricting the top and left values to a certain range:
initPattern = function() {
for(var i = 0; i < 16 ; ++i) {
//opacity, random top, left and angle
var o = 0.1,
t = Math.floor(Math.random()*196) + 5, // between 5 and 200
l = Math.floor(Math.random()*696) + 5, // between 5 and 700
a = Math.floor(Math.random()*101) - 50; // between -50 and 50
$el = $('').css({
opacity : o,
top : t + 'px',
left : l + 'px'
});
if (!$.browser.msie)
$el.transform({'rotate' : a + 'deg'});
$el.appendTo($mbPattern);
}
$mbPattern.children().draggable(); //just for fun
},
When we close the content area we want to move the little boxes back, scattered around randomly again:
disperse = function() {
$mbPattern.children().each(function(i) {
var o = 0.1,
t = Math.floor(Math.random()*196) + 5,
l = Math.floor(Math.random()*696) + 5,
a = Math.floor(Math.random()*101) - 50;
$el = $(this),
param = {
width : '50px',
height : '50px',
opacity : o,
top : t + 'px',
left : l + 'px'
};
if (!$.browser.msie)
param.rotate = a + 'deg';
$el.animate(param, 1000, 'easeOutExpo');
});
},
Let’s handle the events:
initEventsHandler = function() {
/*
click a link in the menu
*/
$menuItems.bind('click', function(e) {
var $this = $(this),
pos = $this.index(),
speed = $this.data('speed'),
easing = $this.data('easing');
//if an item is not yet shown
if(!$menu.data('open')){
//if current animating return
if($menu.data('moving')) return false;
$menu.data('moving', true);
$.when(openItem(pos, speed, easing)).done(function(){
$menu.data({
open : true,
moving : false
});
showContentItem(pos);
$mbPattern.children().fadeOut(500);
});
}
else
showContentItem(pos);
return false;
});
/*
click close makes the boxes animate to the top of the page
*/
$mbClose.bind('click', function(e) {
$menu.data('open', false);
/*
if we would want to show the default image when we close:
changeBGImage('images/default.jpg');
*/
$mbPattern.children().fadeIn(500, function() {
$mbContentItems.hide();
$mbWrapper.hide();
});
disperse();
return false;
});
/*
click an image from "Works" content item,
displays the image on the background
*/
$works.bind('click', function(e) {
var source = $(this).children('img').data('bgimg');
changeBGImage(source);
return false;
});
},
When we click on one of the thumbnails in the “Work” section, we want the background image to change. So we define:
changeBGImage = function(img) {
//if its the current one return
if($mb_bgimage.attr('src') === img || $mb_bgimage.siblings('img').length > 0)
return false;
var $itemImage = $('<img src="'+img+'" alt="Background" class="mb_bgimage" style="display:none;"/>');
$itemImage.insertBefore($mb_bgimage);
$mb_bgimage.fadeOut(1000, function() {
$(this).remove();
$mb_bgimage = $itemImage;
});
$itemImage.fadeIn(1000);
},
This shows a content item when there is already one shown:
showContentItem = function(pos) {
$mbContentItems.hide();
$mbWrapper.show();
$mbContentItems.eq(pos).show().children('.mb_content_inner').jScrollPane();
},
“openItem” moves the boxes from the top to the center of the page, and shows the respective content item:
openItem = function(pos, speed, easing) {
return $.Deferred(
function(dfd) {
$mbPattern.children().each(function(i) {
var $el = $(this),
param = {
width : '100px',
height : '100px',
top : 154 + 100 * Math.floor(i/4),
left : 200 + 100 * (i%4),
opacity : 1
};
if (!$.browser.msie)
param.rotate = '0deg';
$el.animate(param, speed, easing, dfd.resolve);
});
}
).promise();
};
And that’s it! We really hope you enjoyed the tutorial and find it useful!


great tutorial! is there any way to use the form with a php mailer function and return the result to the user? kind of ajax way. i could not figure it out yet 🙁
Hi I’m pretty new with css and scripts too. I liked your work so much.
I’m using it on a site. Can you contact me to send you the website address, you could possibly give suggestions.
Thank you a lot!!
Hi ML,
Thanks for the tut.
I would like to sub-menus to work.
When click on WORK another sub-menu should reveal (Sub-Work1, Sub-Work2, Sub-Work3…)
Please help me add this
How do you make it so that it animates when you click another menu item, even if the box is already open?
Hi Mary,
This is really great. I try to implement a contact form. I find something in here. http://www.bitrepository.com/a-simple-ajax-contact-form-with-php-validation.html
I add it succesfully. but after I sent mail, I close box. and then again if I click contact I couldn’t see a new contact page. it still says your message sent. how I fix this issue?
hi again,
Mary look at this. on this site it says;
$(”).attr(‘src’ , $(this).children(‘img’).data(‘bgimg’));
but if you download source codes, it says;
$(”).attr(‘src’ , $(this).children(‘img’).data(‘bgimg’));
which one is true?
sorry for. i dont want make flood. but i write wrong it. one is;
$(”).attr(‘src’ , $(this).children(‘img’).data(‘bgimg’));
other is;
$(”).attr(‘src’ , $(this).children(‘img’).data(‘bgimg’));
look please img tag. a / is the difference.
Hello-
Im having trouble viewing the webfonts in IE 9? Your demo shows fine, but when I download and view it, the page defaults to a san-serif Arial font instead of showing the PT Sans Narrow or the Astloch. It works fine in Firefox 5 though. Do you know why it wont show in IE?
Thanks! Awesome tutorial!
Thelma
is it possible to center the content?
I tried but i dont reach it… need some help pls 🙁
This is freaking awesome.
I have a suggestion, though. I think it would be cool if the URL also changes, e.g. http://domain.com/#about
I think it’s possible, just so they have their own permalink.
I love this site and all accompanying tutorials! Figures I find it 2 weeks after graduating from a web program!
fantastic job!
nothing to add – perfect be beeing simple but not simple.
Very good . thanks
I am trying to implement the contact form on the site. This section was missing from the tutorial. Some pointers on how to would be great.
Thank you
Could someone tell me how to make an adaptable backgrgound like that ? thanks
Hey there is a little favor to ask…
What if i like to change the background picture with menu buttons…
It’s like this
Click on Home then the Background changes and when i click about me the background changes again…
Is it possible to do it?
Thanks Good job BTW
Hi all
I really need some help implementing the contact form in this template. Can anyone offer me some insight. Please email me at compservandrepair@gmail.com.
Thank you
WOW…Amazing
Dear Mary, thanks for a wonderful tutorial! I have not changed a javascript before so I have a small question: would it be possible to change the script so it calls another menu like say “mb_menu3” additionally to “mb_menu”?
I tried this:
var $menu = $(‘#mb_menu’, ‘#mb_menu3’),
but guess I need to change some more here?
$menuItems = $menu.children(‘a’),
Cause I can click the link, but the boxes won´t move…
Any help would be very apppreciated…
Thanks a lot and all the best from Berlin City!
H!
Awesome…
but i dont know how can I do something when somebody click on send, the text message send to my e-mail address!!! 🙁
I download a script but dunno how to put that into my contact page…
can someone help me plz?
here is my e-mail address:
mv_mk@yahoo.com
VISIT ME.. 🙂 GREAT THEME
WOW…Amazing
I have followed the tutorial and it worked out really well.
How can i make the contact form work? and where shd i add the email in the script.
kindly guide me how to make it work or provide me with some links where i can find. how to make the contact form work.
Cheers~
I want to make the container center to page horizontally & Vertically. I applied css to mb_content_wrapper & its work fine. But how i set the same when small boxes are creating. I tried to change the js but not successful.
If anyone know about this please help
active follower of this site. I’m a graphic designeer with not much coding skill in JQuery. I would like to use this to show my portfolio on web. Thank you Mary Lou .
Hi all, I have a problem, when a tried to test in my computer I got alot of error with js, I changed the url but I got a error message from jquery.transform-0.9.3.min_.js, it said Object spected, and I can´t test in my computer, any idea ?
Please help me