
Free course recommendation: Master JavaScript animation with GSAP through 34 free video lessons, step-by-step projects, and hands-on demos. Enroll now →
Threepipe is a new framework for creating 3D web applications using JavaScript or TypeScript. It provides a high-level API built on top of Three.js, offering a more intuitive and efficient way to develop 3D experiences for the web. Threepipe comes with a plugin system (and many built-in plugins), making it easy to extend functionality and integrate various features into your 3D projects.
In this tutorial, we’ll create an interactive 3D device mockup showcase using Threepipe, featuring a MacBook and an iPhone model, where users can interact with the model by clicking and hovering over the objects, and drop images to display on the devices. Check out the final version.
See the Pen ThreePipe: Device Mockup Experiment (Codrops) by Palash Bansal (@repalash).
This can further be extended to create a full web experience to showcase websites, designs, create and render mockups, etc. This is inspired by an old three.js experiment to render custom device mockups – carbonmockups.com, which requires a lot more work when working with only three.js from scratch. This tutorial will cover setting up the model, animations in a no-code editor and using code with predefined plugins to add user interactions for websites.
Setting up the project
Codepen
You can quickly prototype in JavaScript on Codepen. Here is a starter pen with the basic setup: https://codepen.io/repalash/pen/GRbEONZ?editors=0010
Simply fork the pen and start coding.
Local Setup
To get started with Threepipe locally, you need to have Node.js installed on your machine. Vite Projects require Node.js version 18+, so upgrade if your package manager warns about it.
- A new project can be quickly created using the
npm createcommand. Open your terminal and run the following command:
npm create threepipe@latest- Follow the prompts:
- Choose a project name (e.g., “device-mockup-showcase”)
- Select “JavaScript” or “TypeScript” based on your preference
- Choose “A basic scene” as the template
- This will create a basic project structure with a 3D scene using Threepipe and bundler setup using Vite.
- Navigate to your project directory, and run the project:
cd device-mockup-showcase
npm install
npm run dev- Open the project in your browser by visiting
http://localhost:5173/ and you should see a basic 3D scene.
Starter code
After creating a basic project, open the file src/main.ts.
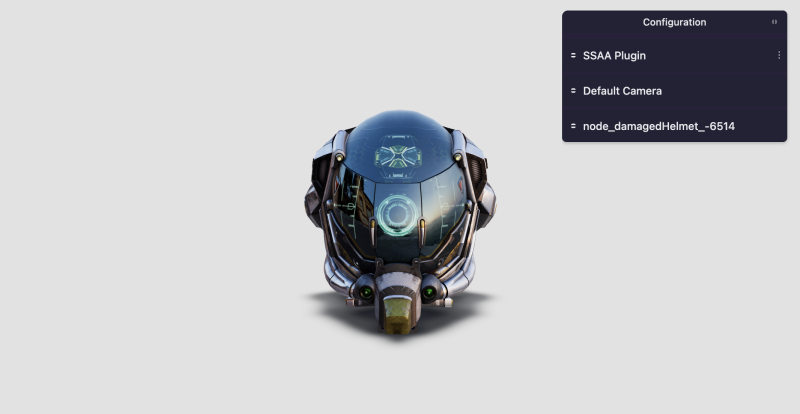
This is a basic setup for a 3D scene using Threepipe that loads a sample 3D model of a helmet and an environment map(for lighting). The scene is rendered on a canvas element with the ID threepipe-canvas(which is added to the file index.html).
The ThreeViewer class is used to create a new 3D viewer instance. The viewer has several components including a Scene, Camera(with controls), Renderer, RenderManager, AssetManager, and some default plugins. It is set up to provide a quickstart to create a three.js app with all the required components. Additionally plugins like LoadingScreenPlugin, ProgressivePlugin, SSAAPlugin, and ContactShadowGroundPlugin are added to extend the functionality of the viewer. We will add more plugins to the viewer for different use cases as we progress through the tutorial.
Check the comments in the code to understand what each part does.
import {
  ContactShadowGroundPlugin,
  IObject3D,
  LoadingScreenPlugin,
  ProgressivePlugin,
  SSAAPlugin,
  ThreeViewer
} from 'threepipe';
import {TweakpaneUiPlugin} from '@threepipe/plugin-tweakpane';

async function init() {

  const viewer = new ThreeViewer({
    // The canvas element where the scene will be rendered
    canvas: document.getElementById('threepipe-canvas') as HTMLCanvasElement,
    // Enable/Disable MSAA
    msaa: false,
    // Set the render scale automatically based on the device pixel ratio
    renderScale: "auto",
    // Enable/Disable tone mapping
    tonemap: true,
    // Add some plugins
    plugins: [
        // Show a loading screen while the model is downloading
        LoadingScreenPlugin,
        // Enable progressive rendering and SSAA
        ProgressivePlugin, SSAAPlugin,
        // Add a ground with contact shadows
        ContactShadowGroundPlugin
    ]
  });

  // Add a plugin with a debug UI for tweaking parameters
  const ui = viewer.addPluginSync(new TweakpaneUiPlugin(true));

  // Load an environment map
  await viewer.setEnvironmentMap('https://threejs.org/examples/textures/equirectangular/venice_sunset_1k.hdr', {
    // The environment map can also be used as the scene background
    setBackground: false,
  });

  // Load a 3D model with auto-center and auto-scale options
  const result = await viewer.load<IObject3D>('https://threejs.org/examples/models/gltf/DamagedHelmet/glTF/DamagedHelmet.gltf', {
    autoCenter: true,
    autoScale: true,
  });

  // Add some debug UI elements for tweaking parameters
  ui.setupPlugins(SSAAPlugin)
  ui.appendChild(viewer.scene.uiConfig)
  ui.appendChild(viewer.scene.mainCamera.uiConfig)

  // Every object, material, etc has a UI config that can be added to the UI to configure it.
  const model = result?.getObjectByName('node_damagedHelmet_-6514');
  if (model) ui.appendChild(model.uiConfig, {expanded: false});

}

init();
Creating the 3D scene
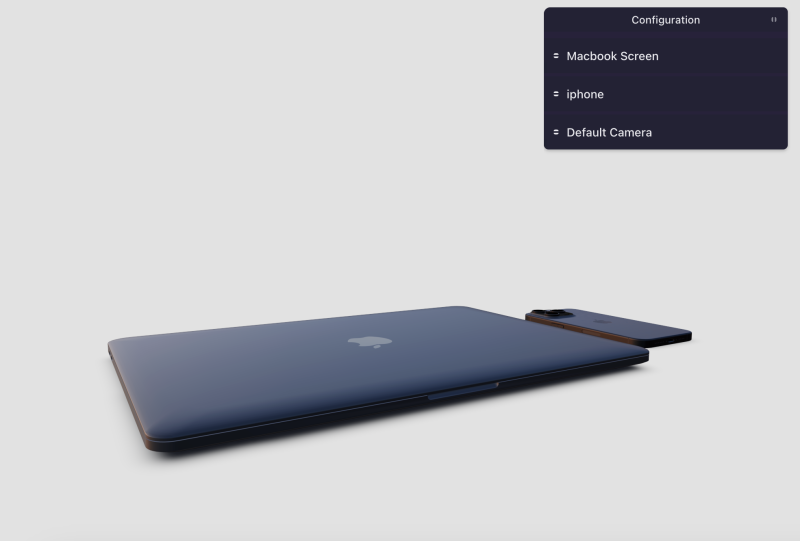
For this showcase, we’ll use 3D models of a MacBook and an iPhone. You can find free 3D models online or create your own using software like Blender.
These are two amazing models from Sketchfab that we will use in this tutorial:
Using the models, we’ll create a scene with a MacBook and an iPhone placed on a table. The user can interact with the scene by rotating and zooming in/out.
Threepipe provides an online editor to quickly create a scene and set up plugin and object properties which can then be exported as glb and used in your project.
When the model is downloaded from the editor, all the settings including the environment map, camera views, post-processing, other plugin settings, etc are included in the glb file. This makes it easy to load the model in the project and start using it right away.
For the tutorial, I have created and configured a file named device-mockup.glb which you can download from here. Check out the video below on how it’s done in the tweakpane editor – https://threepipe.org/examples/tweakpane-editor/
Adding the 3D models to the scene
To load the 3D model in the project, we can either load the file directly from the URL or download the file to the public folder in the project and load it from there.
Since this model includes all the settings, including the environment map, we can remove the environment map loading code from the starter code and load the file directly.
const viewer = new ThreeViewer({
  canvas: document.getElementById('threepipe-canvas') as HTMLCanvasElement,
  msaa: true,
  renderScale: "auto",
  plugins: [
    LoadingScreenPlugin, ProgressivePlugin, SSAAPlugin, ContactShadowGroundPlugin,
  ]
});

const ui = viewer.addPluginSync(new TweakpaneUiPlugin(true));

// Note - We dont need autoscale and center, since that is done in the editor already.
const devices = await viewer.load<IObject3D>('https://asset-samples.threepipe.org/demos/tabletop_macbook_iphone.glb')!;
// or if the model is in the public directory
// const devices = await viewer.load<IObject3D>('./models/tabletop_macbook_iphone.glb')!;

// Find the objects roots by name
const macbook = devices.getObjectByName('macbook')!
const iphone = devices.getObjectByName('iphone')!

const macbookScreen = macbook.getObjectByName('Bevels_2')! // the name of the object in the file
macbookScreen.name = 'Macbook Screen' // setting the name for easy identification in the UI.

console.log(macbook, iphone, macbookScreen);

// Add the object to the debug UI. The stored Transform objects can be seen and edited in the UI.
ui.appendChild(macbookScreen.uiConfig, {expanded: false})
ui.appendChild(iphone.uiConfig, {expanded: false})
// Add the Camera View UI to the debug UI. The stored Camera Views can be seen and edited in the UI.
ui.setupPluginUi(CameraViewPlugin, {expanded: false})
ui.appendChild(viewer.scene.mainCamera.uiConfig)
This code will load the 3D model in the scene and add the objects to the debug UI for tweaking parameters.
Plugins and animations
The file has been configured in the editor with several camera views(states) and object transform(position, rotation) states. This is done using the plugins CameraViewPlugin and TransformAnimationPlugin. To see the stored camera views and object transforms and interact with them, we need to add them to the viewer and the debug UI.
First, add the plugins to the viewer constructor
const viewer = new ThreeViewer({
   canvas: document.getElementById('threepipe-canvas') as HTMLCanvasElement,
   msaa: true,
   renderScale: "auto",
   plugins: [
      LoadingScreenPlugin, ProgressivePlugin, SSAAPlugin, ContactShadowGroundPlugin,
      CameraViewPlugin, TransformAnimationPlugin
   ]
});
Then at the end, add the CameraViewPlugin to the debug UI
ui.setupPluginUi(CameraViewPlugin)We don’t need to add the TransformAnimationPlugin to the UI since the states are mapped to objects and can be seen in the UI when the object is added.
We can now interact with the UI to play the animations and animate to different camera views.
Transform states are added to two objects in the file, the MacBook Screen and the iPhone.
The camera views are stored in the plugin and not with any object in the scene. We can view and animate to different camera views using the plugin UI. Here, we have two sets of camera views, one for the desktop and one for the mobile (with different FoV/Position)
User Interaction
Now that we have the scene set with the models and animations, we can add user interaction to the scene. The idea is to slightly tilt the model when the user hovers over it and fully open it when clicked, along with animating the camera views. Let’s do it step by step.
For the interaction, we can use the PickingPlugin which provides events to handle hover and click interactions with 3D objects in the scene.
First, add PickingPlugin to the viewer plugins
plugins: [
   LoadingScreenPlugin, ProgressivePlugin, SSAAPlugin, ContactShadowGroundPlugin,
   CameraViewPlugin, TransformAnimationPlugin, PickingPlugin
]
With this, we can now click on any object in the scene and it will be highlighted with a bounding box.
Now, we can configure the plugin to hide this box and subscribe to the events provided by the plugin to handle the interactions.
// get the plugin instance from the viewer
const picking = viewer.getPlugin(PickingPlugin)!
const transformAnim = viewer.getPlugin(TransformAnimationPlugin)!

// disable the widget(3D bounding box) that is shown when an object is clicked
picking.widgetEnabled = false

// subscribe to the hitObject event. This is fired when the user clicks on the canvas.
picking.addEventListener('hitObject', async(e) => {
   const object = e.intersects.selectedObject as IObject3D
   // selectedObject is null when the user clicks the empty space
   if (!object) {
       // close the macbook screen and face down the iphone
      await transformAnim.animateTransform(macbookScreen, 'closed', 500)?.promise
      await transformAnim.animateTransform(iphone, 'facedown', 500)?.promise
      return
   }
   // get the device name from the object
   const device = deviceFromHitObject(object)
   // Change the selected object to the root of the device models. This is used by the widget or other plugins like TransformControlsPlugin to allow editing.
   e.intersects.selectedObject = device === 'macbook' ? macbook : iphone

   // Animate the transform state of the object based on the device name that is clicked
   if(device === 'macbook')
      await transformAnim.animateTransform(macbookScreen, 'open', 500)?.promise
   else if(device === 'iphone')
      await transformAnim.animateTransform(iphone, 'floating', 500)?.promise
})
Here, the animateTransform function is used to animate the transform state of the object. The function takes the object, the state name, and the duration as arguments. The promise returned by the function can be used to wait for the animation to complete.
The deviceFromHitObject function is used to get the device name from the object clicked. This function traverses the parents of the object to find the device model.
function deviceFromHitObject(object: IObject3D) {
   let device = ''
   object.traverseAncestors(o => {
      if (o === macbook) device = 'macbook'
      if (o === iphone) device = 'iphone'
   })
   return device
}
With this code, we can now interact with the scene by clicking on the models to open/close the MacBook screen and face down/floating the iPhone.
Now, we can add camera animations as well to animate to different camera views when the user interacts with the scene.
Get the plugin instance
const cameraView = viewer.getPlugin(CameraViewPlugin)!Update the listener to animate the views using the animateToView function. The views are named ‘start’, ‘macbook’, and ‘iphone’ in the plugin.
const object = e.intersects.selectedObject as IObject3D
if (!object) {
   await Promise.all([
      transformAnim.animateTransform(macbookScreen, 'closed', 500)?.promise,
      transformAnim.animateTransform(iphone, 'facedown', 500)?.promise,
      cameraView.animateToView('start', 500),
   ])
   return
}
const device = deviceFromHitObject(object)
if(device === 'macbook') {
   await Promise.all([
     cameraView.animateToView('macbook', 500),
     await transformAnim.animateTransform(macbookScreen, 'open', 500)?.promise
   ])
}else if(device === 'iphone') {
   await Promise.all([
     cameraView.animateToView('iphone', 500),
     await transformAnim.animateTransform(iphone, 'floating', 500)?.promise
   ])
}
This would now also animate the camera to the respective views when the user clicks on the models.
In the same way, PickingPlugin provides an event hoverObjectChanged that can be used to handle hover interactions with the objects.
This is pretty much the same code, but we are animating to different states(with different durations) when the user hovers over the objects. We don’t need to animate the camera here since the user is not clicking on the objects.
// We need to first enable hover events in the Picking Plugin (disabled by default)
picking.hoverEnabled = true

picking.addEventListener('hoverObjectChanged', async(e) => {
   const object = e.object as IObject3D
   if (!object) {
      await Promise.all([
         transformAnim.animateTransform(macbookScreen, 'closed', 250)?.promise,
         transformAnim.animateTransform(iphone, 'facedown', 250)?.promise,
      ])
      return
   }
   const device = deviceFromHitObject(object)
   if(device === 'macbook') {
      await transformAnim.animateTransform(macbookScreen, 'hover', 250)?.promise
   }else if(device === 'iphone') {
      await transformAnim.animateTransform(iphone, 'tilted', 250)?.promise
   }
})
On running this, the MacBook screen will slightly open when hovered over and the iPhone will slightly tilt.
Drop files
To allow users to drop images to display on the devices, we can use the DropzonePlugin provided by Threepipe. This plugin allows users to drag and drop files onto the canvas and handle the files in the code.
The plugins can be set up by simply passing dropzone property in the ThreeViewer constructor. The plugin is added and set up automatically.
Let’s set some options to handle the images dropped on the canvas.
const viewer = new ThreeViewer({
  canvas: document.getElementById('threepipe-canvas') as HTMLCanvasElement,
  // ...,
  dropzone: {
    allowedExtensions: ['png', 'jpeg', 'jpg', 'webp', 'svg', 'hdr', 'exr'],
    autoImport: true,
    addOptions: {
      disposeSceneObjects: false,
      autoSetBackground: false,
      autoSetEnvironment: true, // when hdr, exr is dropped
    },
  },
  // ...,
});
We are setting autoSetEnvironment to true here, which will automatically set the environment map of the scene when an HDR or EXR file is dropped on the canvas. This way a user can drop their own environment map and it will be used for lighting.
Now, to set the dropped image to the devices, we can listen to the loadAsset event of the AssetManager and set the image to the material of the device screen. This event is called since the DropzonePlugin also automatically imports as a three.js Texture object and loads the file in the asset manager. To get more control, you can also subscribe to the events in the DropzonePlugin and handle the files yourself.
// Listen to when a file is dropped
viewer.assetManager.addEventListener('loadAsset', (e)=>{
  if (!e.data?.isTexture) return
  const texture = e.data as ITexture
  texture.colorSpace = SRGBColorSpace
  // The file has different objects that have the material.
  const mbpScreen = viewer.scene.getObjectByName('Object_7')?.material as PhysicalMaterial
  const iPhoneScreen = viewer.scene.getObjectByName('xXDHkMplTIDAXLN')?.material as PhysicalMaterial
  console.log(mbpScreen, iPhoneScreen)
  if(!mbpScreen || !iPhoneScreen) return
  mbpScreen.color.set(0,0,0)
  mbpScreen.emissive.set(1,1,1)
  mbpScreen.roughness = 0.2
  mbpScreen.metalness = 0.8
  mbpScreen.map = null
  mbpScreen.emissiveMap = texture
  iPhoneScreen.emissiveMap = texture
  mbpScreen.setDirty()
  iPhoneScreen.setDirty()
})
This code listens to the loadAsset event and checks if the loaded asset is a texture. If it is, it sets the texture to the material of the MacBook and iPhone screens. The texture is set as the emissive map of the material to make it glow. The emissive color is set to white to make the texture visible. The changes in the material need to be done only in the Macbook screen material and not the iPhone, since iPhone material setup was done in the editor directly.
Final touches
While interacting with the project, you might notice that the animations are not properly synced. This is because the animations are running asynchronously and not waiting for the previous animation to complete.
To fix this, we need to maintain a state properly and wait for any animations to finish before changing it.
Here is the final code with proper state management and other improvements in typescript. The JavaScript version can be found on Codepen.
import {
  CameraViewPlugin, CanvasSnapshotPlugin,
  ContactShadowGroundPlugin,
  IObject3D, ITexture,
  LoadingScreenPlugin, PhysicalMaterial,
  PickingPlugin,
  PopmotionPlugin, SRGBColorSpace,
  ThreeViewer,
  timeout,
  TransformAnimationPlugin,
  TransformControlsPlugin,
} from 'threepipe'
import {TweakpaneUiPlugin} from '@threepipe/plugin-tweakpane'

async function init() {

  const viewer = new ThreeViewer({
    canvas: document.getElementById('threepipe-canvas') as HTMLCanvasElement,
    msaa: true,
    renderScale: 'auto',
    dropzone: {
      allowedExtensions: ['png', 'jpeg', 'jpg', 'webp', 'svg', 'hdr', 'exr'],
      autoImport: true,
      addOptions: {
        disposeSceneObjects: false,
        autoSetBackground: false,
        autoSetEnvironment: true, // when hdr, exr is dropped
      },
    },
    plugins: [LoadingScreenPlugin, PickingPlugin, PopmotionPlugin,
      CameraViewPlugin, TransformAnimationPlugin,
      new TransformControlsPlugin(false),
      CanvasSnapshotPlugin,
      ContactShadowGroundPlugin],
  })

  const ui = viewer.addPluginSync(new TweakpaneUiPlugin(true))

  // Model configured in the threepipe editor with Camera Views and Transform Animations, check the tutorial to learn more.
  // Includes Models from Sketchfab by timblewee and polyman Studio and HDR from polyhaven/threejs.org
  // https://sketchfab.com/3d-models/apple-iphone-15-pro-max-black-df17520841214c1792fb8a44c6783ee7
  // https://sketchfab.com/3d-models/macbook-pro-13-inch-2020-efab224280fd4c3993c808107f7c0b38
  const devices = await viewer.load<IObject3D>('./models/tabletop_macbook_iphone.glb')
  if (!devices) return

  const macbook = devices.getObjectByName('macbook')!
  const iphone = devices.getObjectByName('iphone')!

  const macbookScreen = macbook.getObjectByName('Bevels_2')!
  macbookScreen.name = 'Macbook Screen'

  // Canvas snapshot plugin can be used to download a snapshot of the canvas.
  ui.setupPluginUi(CanvasSnapshotPlugin, {expanded: false})
  // Add the object to the debug UI. The stored Transform objects can be seen and edited in the UI.
  ui.appendChild(macbookScreen.uiConfig, {expanded: false})
  ui.appendChild(iphone.uiConfig, {expanded: false})
  // Add the Camera View UI to the debug UI. The stored Camera Views can be seen and edited in the UI.
  ui.setupPluginUi(CameraViewPlugin, {expanded: false})
  ui.appendChild(viewer.scene.mainCamera.uiConfig)
  ui.setupPluginUi(TransformControlsPlugin, {expanded: true})

  // Listen to when an image is dropped and set it as the emissive map for the screens.
  viewer.assetManager.addEventListener('loadAsset', (e)=>{
    if (!e.data?.isTexture) return
    const texture = e.data as ITexture
    texture.colorSpace = SRGBColorSpace
    // The file has different objects that have the material.
    const mbpScreen = viewer.scene.getObjectByName('Object_7')?.material as PhysicalMaterial
    const iPhoneScreen = viewer.scene.getObjectByName('xXDHkMplTIDAXLN')?.material as PhysicalMaterial
    console.log(mbpScreen, iPhoneScreen)
    if(!mbpScreen || !iPhoneScreen) return
    mbpScreen.color.set(0,0,0)
    mbpScreen.emissive.set(1,1,1)
    mbpScreen.roughness = 0.2
    mbpScreen.metalness = 0.8
    mbpScreen.map = null
    mbpScreen.emissiveMap = texture
    iPhoneScreen.emissiveMap = texture
    mbpScreen.setDirty()
    iPhoneScreen.setDirty()
  })

  // Separate views are created in the file with different camera fields of view and positions to account for mobile screen.
  const isMobile = ()=>window.matchMedia('(max-width: 768px)').matches
  const viewName = (key: string) => isMobile() ? key + '2' : key

  const transformAnim = viewer.getPlugin(TransformAnimationPlugin)!
  const cameraView = viewer.getPlugin(CameraViewPlugin)!

  const picking = viewer.getPlugin(PickingPlugin)!
  // Disable widget(3D bounding box) in the Picking Plugin (enabled by default)
  picking.widgetEnabled = false
  // Enable hover events in the Picking Plugin (disabled by default)
  picking.hoverEnabled = true

  // Set initial state
  await transformAnim.animateTransform(macbookScreen, 'closed', 50)?.promise
  await transformAnim.animateTransform(iphone, 'facedown', 50)?.promise
  await cameraView.animateToView(viewName('start'), 50)

  // Track the current and the next state.
  const state = {
    focused: '',
    hover: '',
    animating: false,
  }
  const nextState = {
    focused: '',
    hover: '',
  }
  async function updateState() {
    if (state.animating) return
    const next = nextState
    if (next.focused === state.focused && next.hover === state.hover) return
    state.animating = true
    const isOpen = state.focused
    Object.assign(state, next)
    if (state.focused) {
      await Promise.all([
        transformAnim.animateTransform(macbookScreen, state.focused === 'macbook' ? 'open' : 'closed', 500)?.promise,
        transformAnim.animateTransform(iphone, state.focused === 'iphone' ? 'floating' : 'facedown', 500)?.promise,
        cameraView.animateToView(viewName(state.focused === 'macbook' ? 'macbook' : 'iphone'), 500),
      ])
    } else if (state.hover) {
      await Promise.all([
        transformAnim.animateTransform(macbookScreen, state.hover === 'macbook' ? 'hover' : 'closed', 250)?.promise,
        transformAnim.animateTransform(iphone, state.hover === 'iphone' ? 'tilted' : 'facedown', 250)?.promise,
      ])
    } else {
      const duration = isOpen ? 500 : 250
      await Promise.all([
        transformAnim.animateTransform(macbookScreen, 'closed', duration)?.promise,
        transformAnim.animateTransform(iphone, 'facedown', duration)?.promise,
        isOpen ? cameraView.animateToView(viewName('front'), duration) : null,
      ])
    }
    state.animating = false
  }
  async function setState(next: typeof nextState) {
    Object.assign(nextState, next)
    while (state.animating) await timeout(50)
    await updateState()
  }

  function deviceFromHitObject(object: IObject3D) {
    let device = ''
    object.traverseAncestors(o => {
      if (o === macbook) device = 'macbook'
      if (o === iphone) device = 'iphone'
    })
    return device
  }

  // Fired when the current hover object changes.
  picking.addEventListener('hoverObjectChanged', async(e) => {
    const object = e.object as IObject3D
    if (!object) {
      if (state.hover && !state.focused) await setState({hover: '', focused: ''})
      return
    }
    if (state.focused) return
    const device = deviceFromHitObject(object)
    await setState({hover: device, focused: ''})
  })

  // Fired when the user clicks on the canvas.
  picking.addEventListener('hitObject', async(e) => {
    const object = e.intersects.selectedObject as IObject3D
    if (!object) {
      if (state.focused) await setState({hover: '', focused: ''})
      return
    }
    const device = deviceFromHitObject(object)
    // change the selected object for transform controls.
    e.intersects.selectedObject = device === 'macbook' ? macbook : iphone
    await setState({focused: device, hover: ''})
  })

  // Close all devices when the user presses the Escape key.
  document.addEventListener('keydown', (ev)=>{
    if (ev.key === 'Escape' && state.focused) setState({hover: '', focused: ''})
  })

}

init()
Here, we are maintaining the state of the scene and waiting for the animations to complete before changing the state. This ensures that the animations are properly synced and the user interactions are handled correctly. Since we are using a single nextState, only the last interaction is considered and the previous ones are ignored.
Also CanvasSnapshotPlugin and TransformControlsPlugin are added to the viewer to allow users to take snapshots of the canvas and move/rotate the devices on the table. Check the debug UI for both the plugins.
Check out the full project on Codepen or Github and play around with the scene.
Codepen: https://codepen.io/repalash/pen/ExBXvby?editors=0010 (JS)
Github: https://github.com/repalash/threepipe-device-mockup-codrops (TS)
Next Steps
This tutorial covers the basics of creating an interactive 3D device mockup showcase using Threepipe. You can further enhance the project by adding more models, animations, and interactions.
Extending the model can be done in both the editor or in the code. Checkout the Threepipe website for more.
Here are some ideas to extend the project:
- Add some post-processing plugins like SSAO, SSR, etc to enhance the visuals.
- Create a custom environment map or use a different HDR image for the scene.
- Add more 3D models and create a complete 3D environment.
- Embed an iframe in the scene to display a website or a video directly on the device screens.
- Add video rendering to export 3d mockups of UI designs.


