
Free course recommendation: Master JavaScript animation with GSAP through 34 free video lessons, step-by-step projects, and hands-on demos. Enroll now →
In this comprehensive tutorial, we will cover the fundamentals of Theatre.js and explore how to craft stunning animation sequences. We will demonstrate how to animate a Three.js cube, integrate eye-catching visual effects, modify colors, experiment with HTML elements, and synchronize the animation with sound playback at specific intervals.
If you prefer a video tutorial, you can follow this link.
Table of Contents
- Installation and setup
- Add theatre.js to the project
- Create cube and floor
- Import Theatre and create a project
- Objects and props
- Animating the cube
- Adding keyframes
- Graph editor
- Modifying colors
- Box glow when stretched
- Speed lines effect
- Comic text effect
- Playing with pointer position: Sound effects
- Tone mapping and encoder
- Deploy to production
Installation and setup
Before anything, we need a starter template with Three.js and a basic scene. Theatre.js has two essential packages:
- @theatre/studio is the editor GUI that we use to create animations
- @theatre/core plays the animations we’ve created.
We can add the theatre.js packages like this:
# with npm
npm install --save @theatre/core @theatre/studio
# with yarn
yarn add @theatre/core @theatre/studioAlternatively, you can download this starter template that comes with all the required dependencies, and run the following commands:
# Install the dependencies
yarn install

# Start the server
yarn run dev.
Create cube and floor
Using my starter template gives us a simple cube, a floor, some lighting and orbit controls.
// Cube
  const geometry = new THREE.BoxGeometry(10, 10, 10);
  const material = new THREE.MeshPhongMaterial({ color: 0x049ef4 });
  const box = new THREE.Mesh(geometry, material);
  box.castShadow = true;
  box.receiveShadow = true;
  scene.add(box);

// Floor
  const floorGeometry = new THREE.CylinderGeometry(30, 30, 300, 30);
  const floorMaterial = new THREE.MeshPhongMaterial({ color: 0xf0f0f0 });
  const floor = new THREE.Mesh(floorGeometry, floorMaterial);
  floor.position.set(0, -150, 0);
  floor.receiveShadow = true;
  scene.add(floor);

// Lights
  const ambLight = new THREE.AmbientLight(0xfefefe, 0.2);
  const dirLight = new THREE.DirectionalLight(0xfefefe, 1);
  dirLight.castShadow = true;
  dirLight.shadow.mapSize.width = 1024;
  dirLight.shadow.mapSize.height = 1024;
  dirLight.shadow.camera.far = 100;
  dirLight.shadow.camera.near = 1;
  dirLight.shadow.camera.top = 40;
  dirLight.shadow.camera.right = 40;
  dirLight.shadow.camera.bottom = -40;
  dirLight.shadow.camera.left = -40;
  dirLight.position.set(20, 30, 20);
  scene.add(ambLight, dirLight);

// OrbitControls
  controls = new OrbitControls(camera, renderer.domElement);
  controls.enableZoom = true;
  controls.enableDamping = true;
  controls.autoRotate = false;
  controls.dampingFactor = 0.1;
  controls.minDistance = 2.4;
  controls.target.set(0, 20, 0);
Import Theatre and create a project
We need to import { getProject, types } from theatre/core. Once that’s done, we also need to import studio from @theatre/studio and initialize studio.
A project in Theatre.js is like a saved file. Projects are stored in the localStorage, so you don’t lose your progress if you close and reopen your browser. Create a new theatre project and give it a name.
Then let’s create a new sheet. A sheet contains all the objects that can be animated.
import { getProject, types } from '@theatre/core';
import studio from '@theatre/studio';
studio.initialize();

// Create a project for the animation
const project = getProject('TheatreTutorial_1');

// Create a sheet
const sheet = project.sheet('AnimationScene');
Objects and props
Every object that needs to be animated has a corresponding Theatre Sheet Object. These Sheet Objects contain properties, or Props, that can be animated to create movement and other dynamic effects in the scene.
Let’s create a new boxObject and call it ‘Box’.
const boxObj = sheet.object('Box', {});Props correspond to specific characteristics of the object that can be animated. Props can have different types, which can be imported with import {types} from “@theatre/core”.
We’ll add some props. Let’s start with rotation by creating a prop of type compound and add xR, yR and zR of type number, value: 0 and a range: [-Math.PI, Math.PI].
Similarly, let’s add props for position and scale. Adding a nudgeMultiplier to these gives us more granular control.
const boxObj = sheet.object('Box', {
rotation: types.compound({
xR: types.number(0, { range: [-Math.PI, Math.PI] }),
yR: types.number(0, { range: [-Math.PI, Math.PI] }),
zR: types.number(0, { range: [-Math.PI, Math.PI] }),
}),
position: types.compound({
x: types.number(0, { nudgeMultiplier: 0.1 }),
y: types.number(0, { nudgeMultiplier: 0.1 }),
z: types.number(0, { nudgeMultiplier: 0.1 }),
}),
scale: types.compound({
xS: types.number(1, { nudgeMultiplier: 0.1 }),
yS: types.number(1, { nudgeMultiplier: 0.1 }),
zS: types.number(1, { nudgeMultiplier: 0.1 }),
}),
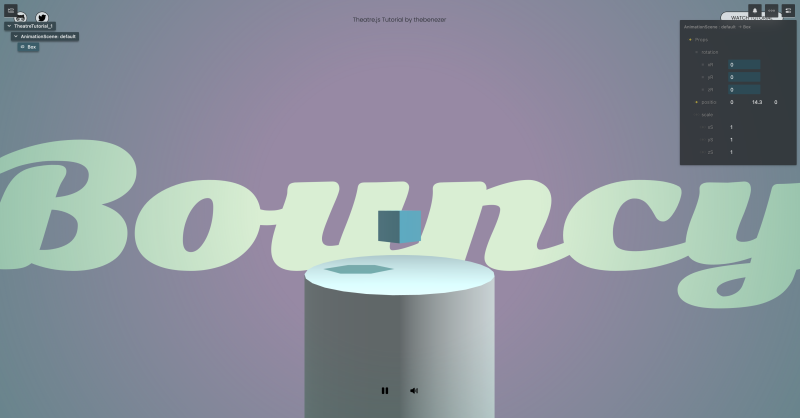
});We can now see that we have a new Box object under our sheet.

Animating the cube
Time to animate our cube. We need a way to rotate our cube mesh based on the values of the boxObj props. This can be done by listening to the changes of the boxObj using the onValuesChange() hook.
boxObj.onValuesChange((values) => {
    const { xR, yR, zR } = values.rotation;
    box.rotation.set(xR, yR, zR);
    const { x, y, z } = values.position;
    box.position.set(x, y, z);
    const { xS, yS, zS } = values.scale;
    box.scale.set(xS, yS, zS);
});
Moving the sliders now affects our cube in real time.
Adding keyframes
Let’s add some keyframes. You can right-click on any of the props and click sequence or sequence all.
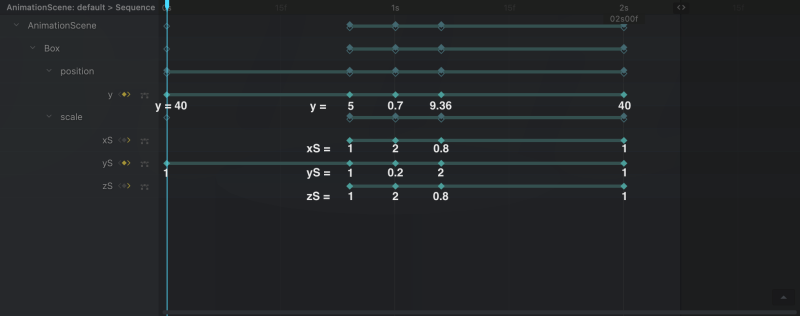
This brings up the sequence editor with the sequenced props. We can resize the sequence timeline, zoom in or out, and use the blue colored pointer to scrub through the sequence.
Drag to move the pointer and click the yellow button to add a keyframe.

Let’s resize the sequence timeline to be a little over 2 seconds. Then add keyframes to animate our cube’s y position. Similarly let’s sequence the scales and add keyframes to those too. Follow these values or play around until it looks good to you.
Then press spacebar to play the sequence.
Graph editor
Clicking the button beside each of our props in the sequence editor opens the graph editor, or the multi-track curve editor. This comes in handy when we want to finesse the animations by editing the speed curve of one or more tracks by hand.
Click on the links between keyframes to reveal a list of default easing curves that can be used.
Modifying colors
Let’s move on and see how we can modify colors with theatre.js. Let’s create a new object and name it colors. The backgroundColor is of types.rgba(). Similarly we also create props for floor color and box color.
const colorObj = sheet.object('Colors',{
    backgroundColor: types.rgba(),
    floorColor: types.rgba(),
    boxColor: types.rgba(),
})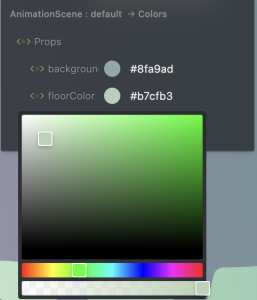
In the onValuesChange() hook, we can either set the scene.background or the background color of the underlying HTML element. Using setRGB(), we set the color of the floor and box materials. Click and drag the color picker to change the color.
colorObj.onValuesChange((values)=>{
    // scene.background = new THREE.Color(values.backgroundColor.toString());
    // @ts-ignore
    document.body.style.backgroundColor = values.backgroundColor;
    floorMaterial.color.setRGB(values.floorColor.r,values.floorColor.g,values.floorColor.b)
    boxMaterial.color.setRGB(values.boxColor.r,values.boxColor.g,values.boxColor.b)
})
Glow when stretched

It would be nice to make the cube glow when stretched. Let’s create a new theatre object: boxEffects.
Then we add a prop boxGlow, to set the emissive color.
const boxEffectsObj = sheet.object('Effects',{
    boxGlow:types.rgba(),
})
boxEffectsObj.onValuesChange((values)=>{
    boxMaterial.emissive.setRGB(values.boxGlow.r,values.boxGlow.g,values.boxGlow.b);
})
Let’s sequence that and add two keyframes with emissive as #000000 on the first few frames and pick a color for the compressed state. Then come back to normal on the last frame.

Speed lines effect

To add the cartoon speed lines vFx, let’s create three cubes and scale them to look like lines and add them to the scene in a group.
// Swoosh Effect Objects
const swooshMaterial = new THREE.MeshBasicMaterial({color:0x222222,transparent:true,opacity:1});
const swooshEffect = new THREE.Group();

const swooshBig = new THREE.Mesh(geometry, swooshMaterial );
swooshBig.scale.set(0.02,2,0.02)
swooshBig.position.set(1,0,-2)

const swooshSmall1 = new THREE.Mesh(geometry, swooshMaterial );
swooshSmall1.scale.set(0.02,1,0.02)
swooshSmall1.position.set(1,0,3)

const swooshSmall2 = new THREE.Mesh(geometry, swooshMaterial );
swooshSmall2.scale.set(0.02,1.4,0.02)
swooshSmall2.position.set(-3,0,0)

swooshEffect.add( swooshBig, swooshSmall1, swooshSmall2 );
swooshEffect.position.set(0,20,0)
scene.add(swooshEffect)
Let’s add more props to the boxEffect Object to play with the scale, position and opacity of the lines. Try playing with the keyframes for this one to get the desired effect.
const boxEffectsObj = sheet.object('Effects',{
    boxGlow:types.rgba(),
    swooshScale:types.number(1,{nudgeMultiplier:0.01}),
    swooshPosition:types.number(0,{nudgeMultiplier:0.01}),
    swooshOpacity:types.number(1,{nudgeMultiplier:0.01})
})
boxEffectsObj.onValuesChange((values)=>{
    boxMaterial.emissive.setRGB(values.boxGlow.r,values.boxGlow.g,values.boxGlow.b);
    swooshEffect.scale.setY(values.swooshScale);
    swooshEffect.position.setY(values.swooshPosition);
    swooshMaterial.opacity=values.swooshScale;
})
Comic text effect

Time for some comic text effect: “Boink !”
Import {CSS2DRenderer,CSS2DObject} from THREE and create a textRenderer. Let’s set the style.position to “absolute” and update the domElement in the orbitControls.
Create a new CSS2Dobject, add it to the scene and then add an HTML element representing the same. Adding the text to the box, makes it follow the box position on the screen.
<div id="boink">Boink!!</div>import {CSS2DRenderer,CSS2DObject} from 'three/examples/jsm/renderers/CSS2DRenderer'
let textRenderer = new CSS2DRenderer();
textRenderer.setSize(window.innerWidth,window.innerHeight);
textRenderer.domElement.style.position = 'absolute';
textRenderer.domElement.style.top = "0";
textRenderer.domElement.style.left = "0";
textRenderer.domElement.style.width = "100%";
textRenderer.domElement.style.height = "100%";
textRenderer.domElement.style.zIndex = "2";
document.body.appendChild(textRenderer.domElement)
// OrbitControls
controls = new OrbitControls(camera, textRenderer.domElement);
// Text Effects
const boinkDom = document.getElementById('boink');
const boinkText = new CSS2DObject(boinkDom);
boinkText.position.set(-25,0,0)
box.add(boinkText);
// add this to your render()/tick() function
// textRenderer.render(scene, camera);
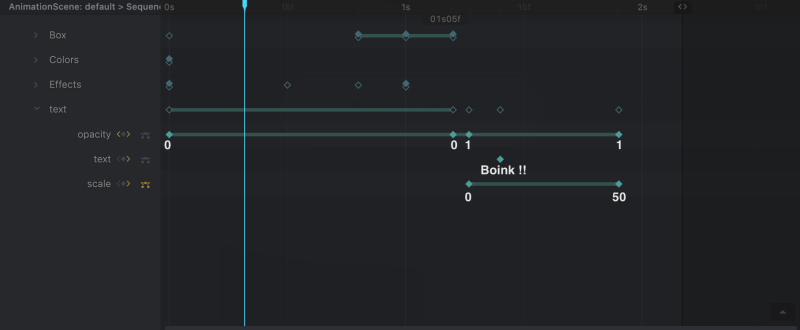
Create a new theatre.js object: textEffectObj with props for opacity, text and scale.
With onValuesChange(), update the innerText of the HTML element. That’s a fun thing about theatre.js: It can be used to modify and animated text, too. Sequence all the props and add keyframe to make the text pop when the box bounces.
const textEffectObj = sheet.object('text',{
    opacity:1,
    text:"",
    scale: 1
});

textEffectObj.onValuesChange((values)=>{
    if(!boinkDom)return;
    boinkDom.innerText = values.text;
    boinkDom.style.opacity = ""+values.opacity
    boinkDom.style.fontSize = ""+values.scale+"px";
})
Playing with pointer position: Sound effects
Finally, to bring everything to life, let’s add sound effects. I searched Pixabay for some free sounds and imported them to the project. Then I loaded them using the Three.js AudioLoader. Here’s how I add sound to my Three.js projects:
// importing my sounds as urls
import swooshSound from '../assets/sounds/whoosh.mp3';
import boinkSound from '../assets/sounds/boink.mp3';
import thudSound from '../assets/sounds/loud-thud-45719.mp3';

const listener = new THREE.AudioListener();
const loader = new THREE.AudioLoader(loadingMgr);
let soundReady = false;
const swoosh = new THREE.Audio(listener)
const boink = new THREE.Audio(listener)
const thud = new THREE.Audio(listener)

setupSounds();

function setupSounds() {
  camera.add(listener);

  audioSetup(swoosh,swooshSound,0.3,loader)
  audioSetup(boink,boinkSound,0.2,loader)
  audioSetup(thud,thudSound,0.5,loader)
}

function audioSetup(sound:THREE.Audio, url:string, volume:number, loader:THREE.AudioLoader){
  loader.load(
    url,
    // onLoad callback
    function ( audioBuffer ) {
      sound.setBuffer( audioBuffer );
      sound.setVolume(volume)
      sound.loop=false;
    },
  );
}
Once the setup is complete, we can proceed to play sounds based on the pointer position in the sequence. We can achieve this by utilizing the onChange() hook and monitoring changes in the pointer position to trigger sound playback at specific intervals.
// play the audio based on pointer position
onChange(sheet.sequence.pointer.position, (position) => {
    if(!soundReady)return;
    if(position > 0.79 && position < 0.83){
        if(!thud.isPlaying){
            thud.play();
        }
    }
    else if(position > 1.18 && position < 1.23){
        if(!boink.isPlaying){
            boink.play();
        }
    }
    else if(position > 0.00 && position<0.04){
        if(!swoosh.isPlaying){
            swoosh.playbackRate= 1.7;
            swoosh.play();
        }
    }
})
To add a new event listener for ‘click’, set soundReady to true, and utilize sheet.sequence.play() to play the animation with an iteration count of Infinity and a range of 0-2.
<style>
.enterSceneContainer{
  z-index: 4;
  position: absolute;
  display: block;
  width: 100%;
  height: 100%;
  text-align: center;
  transition: all 0.5s ease;
}
</style>
<div class="enterSceneContainer" id="tapStart">
    <p>Tap to start</p>
</div>
// Play sequence on click once all assets are loaded
const tapStart = document.getElementById('tapStart');
tapStart.addEventListener(
'click',
function () {
soundReady = true;
tapStart.style.opacity = "0";
setTimeout(()=>{
tapStart.style.display = "none";
},400)
sheet.sequence.play({ iterationCount: Infinity, range: [0, 2] });
}
);Tone mapping and encoder
To enhance the colors of the scene, you can specify different toneMappings and outputEncodings for the renderer.
After experimenting with various options, I opted to set them to LinearToneMapping and sRGBEncoding for this particular project.
renderer.outputEncoding = THREE.sRGBEncoding;
renderer.toneMapping = THREE.LinearToneMapping;
To add fog and synchronize it with the scene background, you can include the relevant code within the `colorObj.onValuesChange()` hook.
scene.fog = new THREE.FogExp2(0xffffff, 0.009);
colorObj.onValuesChange((values)=>{
    // @ts-ignore
    scene.fog.color = new THREE.Color(values.backgroundColor.toString());
    // ... rest of the code here ...
})
Deploy to production
That’s all there is to it! To complete the project, we need to export the animation and deploy it to production. Simply click on the project name within the studio UI and select Export to JSON, then save the state.
Import the saved state into main.js and under getProject, pass the saved state.
import projectState from '../assets/Saved_TheatreState.json';

project = getProject('TheatreTutorial_1', { state: projectState });
Once the animation has been exported, you can remove the `studio import` and `studio.initialize()` since they are not required for production. Alternatively, you could remove or include them conditionally as needed.
let project;
// Using Vite
if (import.meta.env.DEV) {
    studio.initialize();
    // Create a project from local state
    project = getProject('TheatreTutorial_1');
}
else {
    // Create a project from saved state
    project = getProject('TheatreTutorial_1', { state: projectState });
}
Don’t forget to check out the final code. Alternatively, you can follow along with the video tutorial by clicking on this link.
Here are a few variations of a bouncy cube animated with theatre.js:


