From our sponsor: Leverage AI for dynamic, custom website builds with ease.
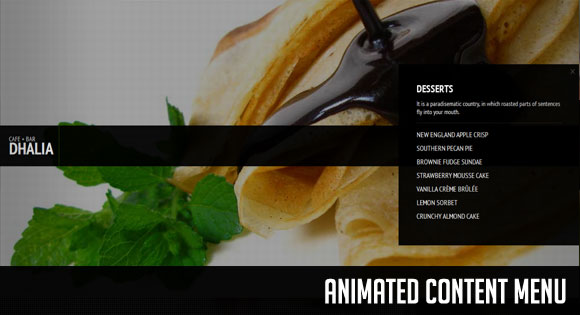
Today we will create a slick animated content menu with jQuery for a restaurant theme. The menu items will be animated and when clicked, a content area with more information will appear. Also, he background image is going to change according to which menu item was clicked.
The main idea is to have a restaurant menu with the different menu categories displayed. Each content are will have some foods/drinks listed. Once a content box is shown, the menu items are going to disappear. If we click on the close button to close the box, the menu items will be shown again.
So, let’s get started.
The Markup
The HTML structure is going to contain some elements for the background image, the grid overlay, the loading icon and the main menu. The Markup for the background is going to look like this:
<div id="ac_background" class="ac_background">
	<img class="ac_bgimage" src="images/Default.jpg" alt="Background"/>
	<div class="ac_overlay"></div>
	<div class="ac_loading"></div>
</div>
As a default background image when the page loads, we will have the image Default.jpg. Whenever we click on a menu item, we are going to change that image by adding another one and making the current one disappear.
The menu content will be wrapped by a div with the class “ac_content”. There will be a title and an unordered list for the items wrapped by a div with the class “ac_menu”:
<div id="ac_content" class="ac_content">
	<h1><span>Cafe + Bar</span>Dhalia</h1>
	<div class="ac_menu">
		<ul>
			<li>
				<a href="images/Appetizers.jpg">Appetizers</a>
				<div class="ac_subitem">
					<span class="ac_close"></span>
					<h2>Appetizers</h2>
					<ul>
						<li>
							A wonderful serenity has taken possession
							of my entire soul, like these sweet mornings
							of spring which I enjoy with my whole heart.
						</li>
						<li>Lobster Bisque</li>
						<li>Smoked Salmon Terrine</li>
						<li>Tuna Ceviche</li>
						<li>Wild Mushroom Flan</li>
						<li>Almond Bruschetta</li>
						<li>Green Chilli Canapee</li>
						<li>Artichoke Rucula Salad</li>
					</ul>
				</div><!-- ac_subitem-->
			</li>
			...
		</ul>
	</div><!-- ac_menu -->
</div><!-- ac_content -->
For each menu item, we will have a div “ac_subitem” which will contain the submenu content box. Inside of that box we will place another list (but it can be any other kind of content).
The link element in the main menu will have a href attribute pointing to the image that we will make appear in the background then.
Let’s take a look at the style.
The CSS
In the beginning of our CSS we will import a reset.css:
@import url('reset.css');
We will make the body black since we want to fade out the background images and make them appear darker while we do that:
body{
	background:#000;
	color:#fff;
	font-family: 'PT Sans Narrow', Arial, sans-serif;
	text-transform:uppercase;
}
The links are going to be white:
a{
	color:#fff;
	text-decoration:none;
}
The background image is going to be fixed and we don’t want to show it in the beginning – we want to take care of the appearance using JavaScript. The positioning and the size of the image is also going to be done dynamically, since we want to place it regarding to the size of the user’s window:
img.ac_bgimage{
	position:fixed;
	left:0px;
	top:0px;
	opacity:0.8;
	display:none;
}
The overlay is going to be placed on top of the image. It’s a repeated pattern that will give the image a neat look:
.ac_overlay{
	width:100%;
	height:100%;
	position:fixed;
	top:0px;
	left:0px;
	background:transparent url(../images/pattern.png) repeat top left;
}
We will place the loading icon in the top right corner of the page and it will appear in the beginning while we load the images:
.ac_loading{
	position:fixed;
	top:10px;
	right:10px;
	background:#000 url(../images/loader.gif) no-repeat center center;
	width:50px;
	height:50px;
	border-radius:10px 10px 10px 10px;
	z-index:999;
	opacity:0.7;
	display:none;
}
The main content div will also be fixed and placed in the middle of the screen. We set the top value to 50% and subtract half of its height from that position by setting the margin to -65 pixel. Like that we place it exactly in the middle of the webpage:
.ac_content{
	position:fixed;
	height:90px;
	width:100%;
	top:50%;
	left:0px;
	margin-top:-65px;
}
The heading to the left will have a black semi-transparent background and we will style the h1 and the span differently. We will also add a 1 pixel margin to the right in order to separate it a bit from the menu wrapper:
.ac_content h1{
	background:transparent url(../images/bg_menu.png) repeat top left;
	display:block;
	float:left;
	width:90px;
	height:50px;
	padding:20px;
	font-size:36px;
	font-weight:bold;
	line-height:20px;
	margin-right:1px;
}
.ac_content h1 span{
	display:block;
	font-weight:normal;
	font-size:14px;
}
The main menu wrapper will have the same background like the heading and we will give it an initial width of 0 pixel. In the JavaScript we will then animate the width when we load the page to fit the width of the window:
.ac_menu{
	background:transparent url(../images/bg_menu.png) repeat top left;
	float:left;
	position:relative;
	height:90px;
	width:0px;
}
The unordered list which will contain the menu items will float right:
.ac_menu > ul{
	float:right;
}
The list items will have a specified height and the overflow will be set to hidden since we want to animate the link elements to appear from the bottom. If we wouldn’t set the overflow to hidden, we would be able to see the link elements under the menu.
.ac_menu > ul > li{
	float:left;
	position:relative;
	height:90px;
	overflow:hidden;
}
The link elements will initially be hidden by setting the margin top to 60 pixel and the opacity to 0. We will animate that margin to 0 pixel and make them opaque, in order for the items to appear, each one with a little delay, creating an interesting effect.
.ac_menu > ul > li a{
	margin-top:60px;
	opacity:0;
	display:block;
	height:90px;
	padding:0px 10px;
	text-align:center;
	line-height:90px;
	outline:none;
	font-size:18px;
	font-weight:bold;
	text-shadow:1px 1px 1px #000;
}
The subitem boxes will have a width of 400 pixel and an initial height of 0 pixel. We will animate that height and the top margin in order for each box to appear from the middle:
.ac_subitem{
	width:400px;
	height:0px; /* animate to 400px */
	top:50%;
	right:0px;
	margin-top:0px; /* animate to -200px */
	position:fixed;
	z-index:99;
	overflow:hidden;
	background:transparent url(../images/bg_menu.png) repeat top left;
}
Let’s give some styling to the content of the subitems:
.ac_subitem h2{
	font-size:22px;
	font-weight:bold;
	color:#fff;
	padding: 40px 0px 0px 40px;
	text-shadow:0px 0px 1px #000;
}
.ac_subitem ul{
	padding:0px 40px;
}
.ac_subitem ul li{
	margin:10px 0px;
}
.ac_subitem ul li:first-child{
	font-size:14px;
	text-transform:none;
	border-bottom:1px dotted #333;
	padding-bottom:15px;
	margin-bottom:15px;
}
And let’s place the little closing cross at the top right corner:
span.ac_close{
	float:right;
	margin:10px;
	width:11px;
	height:12px;
	cursor:pointer;
	background:transparent url(../images/close.png) no-repeat top left;
	opacity:0.4;
}
span.ac_close:hover{
	opacity:1.0;
}
And that’s all the style. Let’s add the magic!
The JavaScript
For the effects will will be using some easing, so we will need to include the jQuery Easing Plugin after including the jQuery script.
Let’s first cache some elements:
var $ac_background	= $('#ac_background'),
$ac_bgimage		= $ac_background.find('.ac_bgimage'),
$ac_loading		= $ac_background.find('.ac_loading'),

$ac_content		= $('#ac_content'),
$title			= $ac_content.find('h1'),
$menu			= $ac_content.find('.ac_menu'),
$mainNav		= $menu.find('ul:first'),
$menuItems		= $mainNav.children('li'),
totalItems		= $menuItems.length,
$ItemImages		= new Array();
We want to preload all the image, so let’s add all the image sources that we have in the href attributes of the link elements in the menu items, and also the one of the current image:
$menuItems.each(function(i) {
	$ItemImages.push($(this).children('a:first').attr('href'));
});
$ItemImages.push($ac_bgimage.attr('src'));
Then, let’s define our main function:
var Menu 			= (function(){
	var init				= function() {
		loadPage();
		initWindowEvent();
	},
	loadPage			= function() {
		/*
			1- loads the bg image and all the item images;
			2- shows the bg image;
			3- shows / slides out the menu;
			4- shows the menu items;
			5- initializes the menu items events
		 */
		$ac_loading.show(); //show loading status image
		$.when(loadImages()).done(function(){
			$.when(showBGImage()).done(function(){
				//hide the loading status image
				$ac_loading.hide();
				$.when(slideOutMenu()).done(function(){
						$.when(toggleMenuItems('up')).done(function(){
						initEventsSubMenu();
					});
				});
			});
		});
	},
	showBGImage			= function() {
		return $.Deferred(
		function(dfd) {
			//adjusts the dimensions of the image to fit the screen
			adjustImageSize($ac_bgimage);
			$ac_bgimage.fadeIn(1000, dfd.resolve);
		}
	).promise();
	},
	slideOutMenu		= function() {
		/* calculate new width for the menu */
		var new_w	= $(window).width() - $title.outerWidth(true);
		return $.Deferred(
		function(dfd) {
			//slides out the menu
			$menu.stop()
			.animate({
				width	: new_w + 'px'
			}, 700, dfd.resolve);
		}
	).promise();
	},
		/* shows / hides the menu items */
		toggleMenuItems		= function(dir) {
		return $.Deferred(
		function(dfd) {
			/*
			slides in / out the items.
			different animation time for each one.
			*/
			$menuItems.each(function(i) {
						var $el_title	= $(this).children('a:first'),
							marginTop, opacity, easing;
						if(dir === 'up'){
							marginTop	= '0px';
							opacity		= 1;
							easing		= 'easeOutBack';
						}
						else if(dir === 'down'){
							marginTop	= '60px';
							opacity		= 0;
							easing		= 'easeInBack';
		}
				$el_title.stop()
				.animate({
									marginTop	: marginTop,
									opacity		: opacity
								 }, 200 + i * 200 , easing, function(){
					if(i === totalItems - 1)
						dfd.resolve();
				});
			});
		}
	).promise();
	},
	initEventsSubMenu	= function() {
		$menuItems.each(function(i) {
			var $item		= $(this), // the <li>
			$el_title	= $item.children('a:first'),
			el_image	= $el_title.attr('href'),
			$sub_menu	= $item.find('.ac_subitem'),
			$ac_close	= $sub_menu.find('.ac_close');

			/* user clicks on a menu item */
			$el_title.bind('click.Menu', function(e) {
					$.when(toggleMenuItems('down')).done(function(){
					openSubMenu($item, $sub_menu, el_image);
				});
				return false;
			});
			/* closes the submenu */
			$ac_close.bind('click.Menu', function(e) {
				closeSubMenu($sub_menu);
				return false;
			});
		});
	},
	openSubMenu			= function($item, $sub_menu, el_image) {
		$sub_menu.stop()
		.animate({
			height		: '400px',
			marginTop	: '-200px'
		}, 400, function() {
			//the bg image changes
			showItemImage(el_image);
		});
	},
	/* changes the background image */
	showItemImage		= function(source) {
		//if its the current one return
		if($ac_bgimage.attr('src') === source)
			return false;

		var $itemImage = $('<img src="'+source+'" alt="Background" class="ac_bgimage"/>');
		$itemImage.insertBefore($ac_bgimage);
		adjustImageSize($itemImage);
		$ac_bgimage.fadeOut(1500, function() {
			$(this).remove();
			$ac_bgimage = $itemImage;
		});
		$itemImage.fadeIn(1500);
	},
	closeSubMenu		= function($sub_menu) {
		$sub_menu.stop()
		.animate({
			height		: '0px',
			marginTop	: '0px'
		}, 400, function() {
			//show items
						toggleMenuItems('up');
		});
	},
	/*
	on window resize, ajust the bg image dimentions,
	and recalculate the menus width
	*/
	initWindowEvent		= function() {
		/* on window resize set the width for the menu */
		$(window).bind('resize.Menu' , function(e) {
			adjustImageSize($ac_bgimage);
			/* calculate new width for the menu */
			var new_w	= $(window).width() - $title.outerWidth(true);
			$menu.css('width', new_w + 'px');
		});
	},
	/* makes an image "fullscreen" and centered */
	adjustImageSize		= function($img) {
		var w_w	= $(window).width(),
		w_h	= $(window).height(),
		r_w	= w_h / w_w,
		i_w	= $img.width(),
		i_h	= $img.height(),
		r_i	= i_h / i_w,
		new_w,new_h,
		new_left,new_top;

		if(r_w > r_i){
			new_h	= w_h;
			new_w	= w_h / r_i;
		}
		else{
			new_h	= w_w * r_i;
			new_w	= w_w;
		}

		$img.css({
			width	: new_w + 'px',
			height	: new_h + 'px',
			left	: (w_w - new_w) / 2 + 'px',
			top		: (w_h - new_h) / 2 + 'px'
		});
	},
	/* preloads a set of images */
	loadImages			= function() {
		return $.Deferred(
		function(dfd) {
			var total_images 	= $ItemImages.length,
			loaded			= 0;
			for(var i = 0; i < total_images; ++i){
				$('<img/>').load(function() {
					++loaded;
					if(loaded === total_images)
						dfd.resolve();
				}).attr('src' , $ItemImages[i]);
			}
		}
	).promise();
	};

	return {
		init : init
	};
})();

/*
call the init method of Menu
 */
Menu.init();
And that’s all! I hope you enjoyed the tutorial and find it useful!


YOU ARE THE BOMB. REALLY. SO NEAT AND SIMPLE. DIGITAL ART.
Hi Mary,
I have a question. How can I make the menu move top-bottom instead of moving form left to right?
Thanks a lot
I´m having an issue with this script. If i click too fast on a menu-item (directly after the page loaded) the script links me to the location of the background image instead of showing me the div.
The same problem is located in your own demo ( http://tympanus.net/Tutorials/AnimatedContentMenu/ )
Can someone please help me out here? I guess the problem is somewhere in the loadPage function but i can’t see it. According to the notes at the loadPage function the script should “5- initializes the menu items events” before the page shows up.
Thanks for this tutorial! Is it possible to add an overlay image when clicking a li in the subitem?
I used the bones of this great tutorial as the structure and mechanics on a site for a Cornish fishmonger:
http://www.pengellys.co.uk
I thought that the big images, simple navigation, and neat function were perfect for an artistic and understated “let the produce do the talking” site. I’m working on amendments to make a neater gallery as part of this.
As always, a superb tutorial, and amazing design by you guys. I hope my attempt to hack it together does it justice.
Cheers,
Brian.
How can I make the menu links link to another page?
hello,
great tutorial, thanks a lot. I have the same “problem” as Chris Davis, I have made my layout all all works fine. I just changed the css fonts to use a font squirrel kit because google fonts gave me display bugs (french characters, don’t know why…), sometimes, text in links was not displayed. With font squirrel I do not have this problem anymore (I use the “Play” font).
but now I would like to have links like “mypage.html” to a subitem, meaning that I would access the site with different urls refering to subitems. My problem is that I can not “activate” a subitem. my “way” would be to use the rel attribute to give the image url, and use the href attr for the real url, that will be for instance mypage.html#page2, then I will have to rewrite http://www.site.com/mypage.html#page2 to http://www.site.com/page2/.
so my problem is only to access directly http://www.site.com/page2/ then it would open the second subitem on load.
do you have any solution for this ?
sorry for my poor english, I’m french, I hope you’ll understand the way I would like to custom this script.
thx in advance,
Olivier
just a little thing about rollovers…
I made rollovers on links, not a problem… but I used color plugin to animate the fading of the background color (lighter that if you do it using jqueryui…).
if I use “animate” without “stop” before it, it can stop the begining animation on load, and then the text will stop while going up 🙁
so I only used “animate”, then I don’t have this problem anymore but the “buttons” blink a lot… if you rollover all menu items 3 times, it will blink 3 times… effect is quite cool but may be anoying… don’t know much…
how do you do your rollovers ??
last question : I would like to make a min-width for my page, meaning that menu items won’t go to a second line. I did that for the ul, but now if I reduce my page width, the ul will go over the h1 🙁 I can’t for the moment “block” the ul on the right of the h1. Just to be precise, my h1 is empty, it’s css defined as a block with a background logo.
mistake in my previous post: second paragraph should starts with :
if I use “animate” with “stop” before it
This is gorgeous… I noticed that the main menu doesn’t quite expand enough vertically to fit all the text. Is there a fix for that so that long lists can be accommodated?
subu > menu can not expand as if you look in the code you’ll see that it expands to 400 px height. on my version, I expand it to 500 px, there’s no automatic expanding. you can choose the defined height but it will be the same for every subitem.
Beautiful! Thank you!
I would love it if the entire menu could also animate back closed if you click a link. It’s very slick otherwise, and even works in IE7!
This is great! i’d like to know if its possible to have the backgrounds change by just hovering over the main menus OR have the menu item delay delay for maybe 3 secs and go straight into a new page.
Great job Mary Lou.
See what i done : http://nunoesteves.com/
Nuno, it’s very beautiful what you did out of it! Cheers, ML
Mary lou great tutorial !!! i’m using it right now but i need your help! how do a i use a hyperlink on the menu bar?
i dont know what to do and the page does not load. sorry for my bad english. thak you!!! =]
Hey Mary Lou!
I was wondering if you could assist me in adding thumbnail pictures within the subitems. Then, when you click the thumbnail pictures, the background changes.
I’ve been trying to incorporate the other tutorial, “Moving Boxes Menu with jQuery” because that one has the picture thumbnails I’m looking for.
I tried combining both codes together and it’s been a disaster lol.
Could you help??
-Thanks =))
You have a great sense of beauty!
Thanks for sharing your art!
from PORTUGAL 🙂
Maybe one day, i’ll give you a donate! 🙂
you deserve!
Thanks
Kevin says: “I´m having an issue with this script. If i click too fast on a menu-item (directly after the page loaded) the script links me to the location of the background image instead of showing me the div…”
I fix it in this way:
ORIGINAL CODE:
$.when(showBGImage()).done(function(){
//hide the loading status image
$ac_loading.hide();
$.when(slideOutMenu()).done(function(){
$.when(toggleMenuItems(‘up’)).done(function(){
initEventsSubMenu();
FIXED CODE:
$.when(loadImages()).done(function(){
$.when(showBGImage()).done(function(){
//hide the loading status image
initEventsSubMenu();
$ac_loading.hide();
$.when(slideOutMenu()).done(function(){
$.when(toggleMenuItems(‘up’)).done(function(){
great tutorial!! thanks so much!
anybody willing to share how to make .ac_subitem scrollable?
cheers!
Hi,
Really wonderful tutorial…
I would like to add a css for link in ac_subitem how can i do it ? i tried a lot of solutions but nothing’s right…
thanks for you help !
Stephane
Hi Mary Lou!!
Amazing tutorial…
I find this today http://www.wewantzedbazi.com/ and it reminded me of something…lol!
I hope that the designer has informed you about the use of your code and your creativity .. 😉
Cheers,
Simone
i too would like to know how to make .ac_subitem scrollable?
Thanks
Just want to say thanks from a Interactive developer coming from the flash world, this is helping me become a better all around developer! You are awesome!
soy de argentina , la verdad que es muy hermoso tu trabajo , uno de los mas lindos que vi.
en cuando a los link de los subitems….
.ac_menu > ul > li .ac_subitem a:hover{
opacity:100;
display: block;
background-color: #00FF00;
}
.ac_menu > ul > li a:hover{
background-color: #e30000;
}
eso le da un lindo toke . saludos
Very nice work, but i found a bug in it – after the website starts and loads, you cannot click the second item in menu (main course), if you do so, it shows you the image of it only.
Oh sorry, my fault, i just found out that when the site IS LOADING, it do this, but NOT when it is once LOADED. Im sorry, excellent work (:
I have a slight problem,
I have tweaked the code to best suit my site and it runs fine on chrome and safari, but the sub-menus open upwards instead of down in firefox and IE.
Any Ideas?
Impressive work Mary, just one question…is it possible to arrange the menu links differently? Thnx…rather than floated on a straight line to be one below the other? thank you once again.
Hi Mary,
Thanks for this awesome tutorial.
Keep up the good work.
Sincerely,
Nikola.
Paul,
Yes you can chage it. On index page > slideOutMenu (line 207 i think) Chage all width(3 of em) to height.
Also you can change them from left to right by using the Float:right/left.
Hope it helps.
Hi everyone,
could someone help me with the Background Image ?
I want the Default image to appear again when i click on the ac_close. Im not sure how to do this.
Do you have fixed bugs with IE 6/7/8 ?
The menu doesn’t works with that browsers!
Hi! Firt of all thank you very much for sharing your beautifull work mary Lou. I had hard time to let it suit me but it was good time too. However I must have done some errors while it doesn´t work : the homepage doesn´t appear completely and the loading icon run for hours without results. Please can you suggest me how to amend it? tschuss
Hi! I would ask you all too, my website is : http://erikacarrozzo.altervista.org, I think it will be very nice since I joined together two Mary Lou´s web concepts; unfortunately it must be an error and the first page can´t loaded completely. Does someone has an idea about the error? Thank you.
Erika, there are two errors on your page (to everybody: it’s really helpful to look at the error console in your browser; in Chrome: right click -> ‘Inspect Element’, and then choose ‘Console’, it will show the errors). The images close.png and me.jpg cannot be found. Check if you have those images and if the paths are correct. Hope it helps, cheers, ML!
P.S. Sorry for not responding to everybody’s issues, I’m trying hard, but it’s just too many 🙂 It’s always helpful to post your URL where you have the problem, just like Erika did!! Thank you all!! Cheers!
Very nice work ! This tutorial will be very helpful for my next project – http://www.chepurnyak.ru/site2/index.html
But in Opera 🙁 – I don’t see right panel – submenu. In others brousers all OK !!!
Can you help me ?
Best regards …
Mary Lou, thank you, now it works! it was a problem of incorrect paths as you suggested, and also me.jpg was to amend too. I appreciate very much your style, your works. Don´t worry, you´re very very nice! Tschüss
Amazing tutorial!
Is it possibile to change the background image not only with the click on menu items? is it possibile to change the background image with click on a link in the sub item content?
Mary Lou: Great tut, thank you!
Pazuzu: Thanks a lot for the fix!
Hi there.. is there a way to make “ac_subitem” come out in center of the screen?
Oh, dear! I’ve already implemented your plugin, but on tablet pc under android we’ve got 4 desktops. So, the background stretches so wide to cover all that size, so we see only 1/4 from the background image. I dont know what to do..
Thanks for the great tutorial.
I just have a simple question, but how can I insert a <a href rel=”nofollow”> into a of ?
When I do this, there’s too much space between the lines, that it takes too much space, so I can’t insert all the contents to the menu.
Sorry for the mistaken post!
I meant how can I insert a (a href) into a (li)of(ul)?
When I do this, there’s too much space between the lines, that it takes too much space, so I can’t insert all the contents to the menu.
Hi ML, you Tut is the bomb diggity :-D, thank you. However, I’m having problems with the way my page is loading. When it loads, you can see the menu bar text on the left hand side of the page rather it coming from the menu bar. Is there anyway I can fix this? Has anyone else come across this?
Cheers,
Jonah
@Alexander, I suggest you look at Serj’s link and Firebug the website.
Konig: “Do you have fixed bugs with IE 6/7/8 ? The menu doesn’t works with that browsers!”
Konig, put that as your first line of code and it will force IE8 and IE9 into compatibility mode so it views it correctly. IE6 and earlier is out of luck though.
Earlier post removed my code.
meta http-equiv=”X-UA-Compatible” content=”IE=7″
put at the end of code.
*at the beginning of your html code. Form automatically removed my angled brackets.
Please, can someone help me with the way my site loads. It’s not doing it in the right sequence yet the sequence which I use is the same in ML’s script. You can see it on http://www.thefashioncroupier.com