From our sponsor: Leverage AI for dynamic, custom website builds with ease.
Today we’d like to share some WebGL experiments with you. The idea is to create a very realistic looking rain effect and put it in different scenarios. In this article, we’ll give an overview of the general tricks and techniques used to make this effect.
Getting Started
If we want to make an effect based on the real world, the first step is to dissect how it actually looks, so we can make it look convincing.
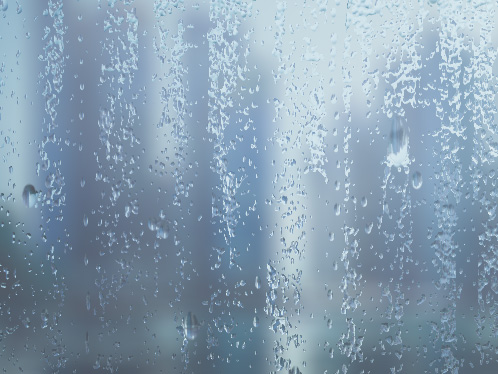
If you look up pictures of water drops on a window in detail (or, of course, observed them in real life already), you will notice that, due to refraction, the raindrops appear to turn the image behind them upside down.
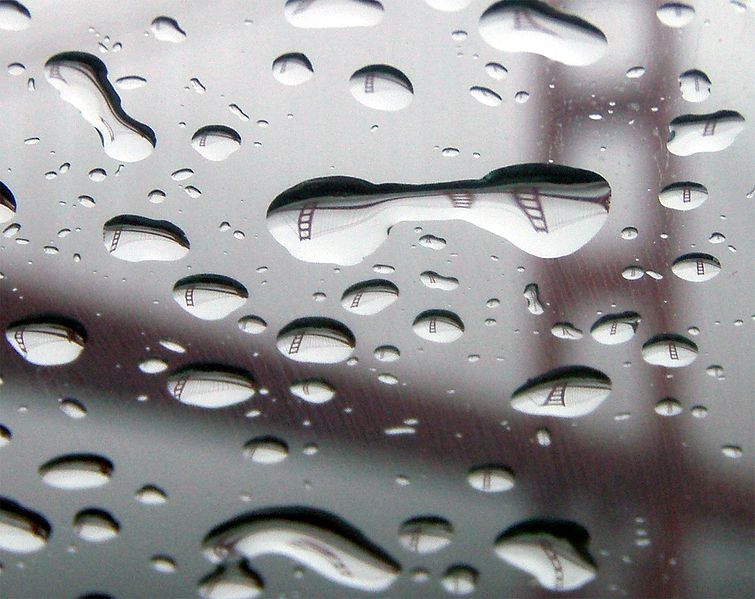
You’ll also see that drops that are close to each other get merged – and if it gets past a certain size, it falls down, leaving a small trail.
To simulate this behavior, we’ll have to render a lot of drops, and update the refraction on them on every frame, and do all this with a decent frame rate, we’ll need a pretty good performance – so, to be able to use hardware accelerated graphics, we’ll use WebGL.
WebGL
WebGL is a JavaScript API for rendering 2D and 3D graphics, allowing the use of the GPU for better performance. It is based on OpenGL ES, and the shaders aren’t written in JS at all, but rather in a language called GLSL.
All in all, that makes it look difficult to use if you’re coming from exclusively web development — it’s not only a new language, but new concepts as well — but once you grasp some key concepts it will become much easier.
In this article we will only show a basic example of how to use it; for a more in depth explanation, check out the excellent WebGl Fundamentals page.
The first thing we need is a canvas element. WebGL renders on canvas, and it is a rendering context like the one we get with canvas.getContext('2d').
<span class="hljs-tag"><<span class="hljs-title">canvas</span> <span class="hljs-attribute">id</span>=<span class="hljs-value">"container"</span> <span class="hljs-attribute">width</span>=<span class="hljs-value">"800"</span> <span class="hljs-attribute">height</span>=<span class="hljs-value">"600"</span>></span><span class="hljs-tag"></<span class="hljs-title">canvas</span>></span>
<span class="hljs-keyword">var</span> canvas = <span class="hljs-built_in">document</span>.getElementById(<span class="hljs-string">"container"</span>);
<span class="hljs-keyword">var</span> gl = canvas.getContext(<span class="hljs-string">"webgl"</span>);
Then we’ll need a program, which is comprised of a vertex shader and a fragment shader. Shaders are functions: a vertex shader will be run once per vertex, and the fragment shader is called once per pixel. Their jobs are to return coordinates and colors, respectively. This is the heart of our WebGL application.
First we’ll create our shaders. This is the vertex shader; we’ll make no changes on the vertices and will simply let the data pass through it:
<script id="vert-shader" type="x-shader/x-vertex">
  // gets the current position
  attribute vec4 a_position;

  void main() {
   // returns the position
   gl_Position = a_position;
  }
</script>
And this is the fragment shader. This one sets the color of each pixel based on its coordinates.
<script id="frag-shader" type="x-shader/x-fragment">
  precision mediump float;

  void main() {
     // current coordinates
     vec4 coord = gl_FragCoord;
     // sets the color
     gl_FragColor = vec4(coord.x/800.0,coord.y/600.0, 0.0, 1.0);
  }
</script>
Now we’ll link the shaders to the WebGL context:
<span class="hljs-function"><span class="hljs-keyword">function</span> <span class="hljs-title">createShader</span>(<span class="hljs-params">gl,source,type</span>)</span>{
  <span class="hljs-keyword">var</span> shader = gl.createShader(type);
  source = <span class="hljs-built_in">document</span>.getElementById(source).text;
  gl.shaderSource(shader, source);
  gl.compileShader(shader);

  <span class="hljs-keyword">return</span> shader;
}

<span class="hljs-keyword">var</span> vertexShader = createShader(gl, <span class="hljs-string">'vert-shader'</span>, gl.VERTEX_SHADER);
<span class="hljs-keyword">var</span> fragShader = createShader(gl, <span class="hljs-string">'frag-shader'</span>, gl.FRAGMENT_SHADER);

<span class="hljs-keyword">var</span> program = gl.createProgram();
gl.attachShader(program, vertexShader);
gl.attachShader(program, fragShader);

gl.linkProgram(program);
gl.useProgram(program);
Then, we’ll have to create an object in which we will render our shader. Here we will just create a rectangle — specifically, two triangles.
<span class="hljs-comment">// create rectangle</span>
<span class="hljs-keyword">var</span> buffer = gl.createBuffer();
gl.bindBuffer(gl.ARRAY_BUFFER, buffer);
gl.bufferData(
    gl.ARRAY_BUFFER,
    <span class="hljs-keyword">new</span> <span class="hljs-built_in">Float32Array</span>([
        -<span class="hljs-number">1.0</span>, -<span class="hljs-number">1.0</span>,
         <span class="hljs-number">1.0</span>, -<span class="hljs-number">1.0</span>,
        -<span class="hljs-number">1.0</span>,  <span class="hljs-number">1.0</span>,
        -<span class="hljs-number">1.0</span>,  <span class="hljs-number">1.0</span>,
         <span class="hljs-number">1.0</span>, -<span class="hljs-number">1.0</span>,
         <span class="hljs-number">1.0</span>,  <span class="hljs-number">1.0</span>]),
    gl.STATIC_DRAW);

<span class="hljs-comment">// vertex data</span>
<span class="hljs-keyword">var</span> positionLocation = gl.getAttribLocation(program, <span class="hljs-string">"a_position"</span>);
gl.enableVertexAttribArray(positionLocation);
gl.vertexAttribPointer(positionLocation, <span class="hljs-number">2</span>, gl.FLOAT, <span class="hljs-literal">false</span>, <span class="hljs-number">0</span>, <span class="hljs-number">0</span>);
Finally, we render the whole thing:
gl.drawArrays(gl.TRIANGLES, <span class="hljs-number">0</span>, <span class="hljs-number">6</span>);
And this is the result:
After that, you can play with the shaders to get a hang of how it works. You can see a lot of great shader examples on ShaderToy.
Raindrops
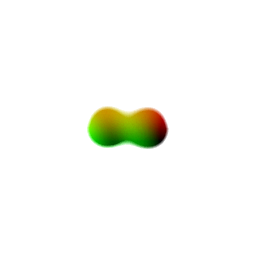
Now let’s see how to make the raindrop effect. First, let’s see how a single raindrop looks:

Now, there are a couple of things going on here.
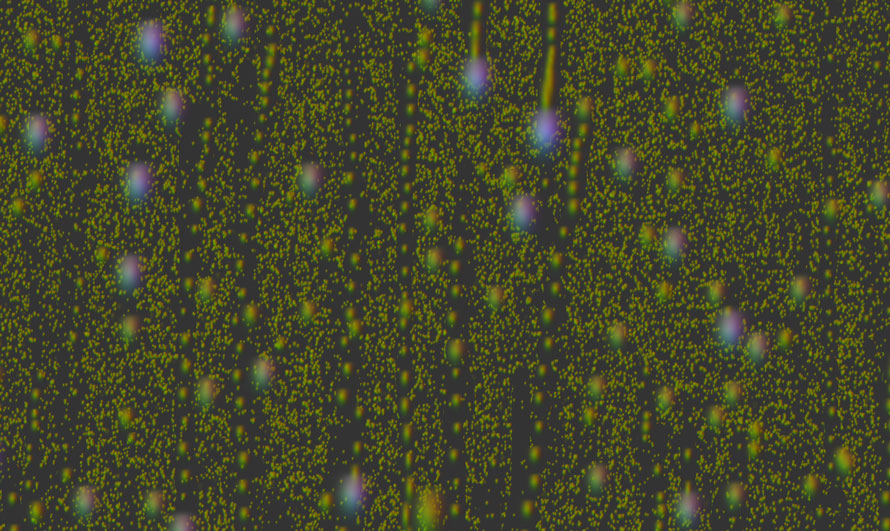
The alpha channel looks like this because we’ll use a technique similar to the one in the Creative Gooey Effects article to make the raindrops stick together.
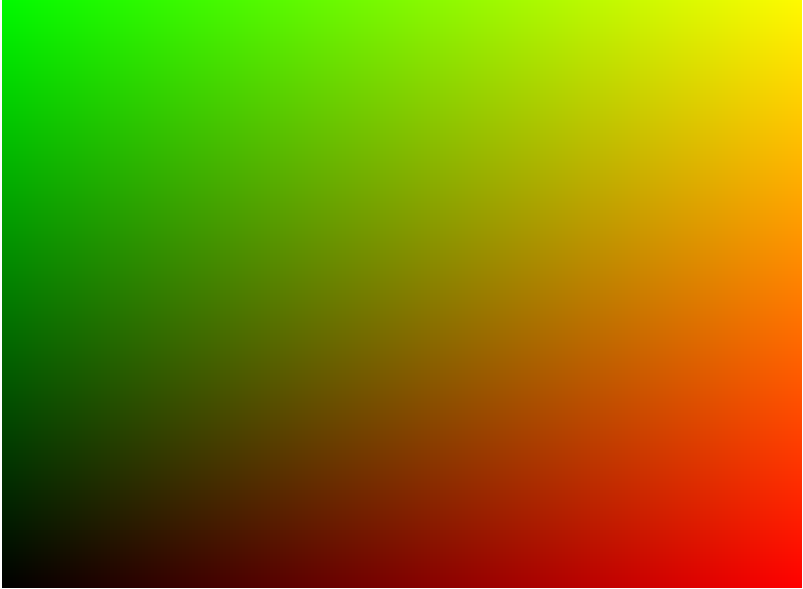
There’s a reason for the color: we’ll be using a technique similar to normal mapping to make the refraction effect. We’ll use the color of the raindrop to get the coordinates of the texture we’ll see through the drop. This is how it looks without the mask:
From this image, we’ll use data from the green channel to get the X position, and from the red channel to get the Y position.

Now we can write our shader and use both that data and the drop’s position to flip and distort the texture right behind the raindrop.

Raining
After creating our raindrop, we’ll make our rain simulation.
Making the raindrops interact with each other can get heavy fast — the number of calculations increase exponentially with each new drop — so we’ll have to optimize a little bit.
In this demo, I’m splitting between large and small drops. The small drops are rendered on a separate canvas and are not kept track of. That way, I can make thousands of them and not get any slower. The downside is that they are static, and since we are making new ones every frame, they accumulate. To fix that, we’ll use our bigger drops.
Since the big drops do move, we can use them to erase smaller drops underneath them. Erasing in canvas is tricky: we have to actually draw something, but use globalCompositeOperation='destination-out'. So, every time a big drop moves, we draw a circle on the small drops canvas using that composite operation to clean the drops and make the effect more realistic.
Finally, we’ll render them all on a big canvas and use that as a texture for our WebGL shader.
To make things lighter, we’ll take advantage of the fact that the background is out of focus, so we’ll use a small texture for it and stretch it out; in WebGL, texture size directly impacts performance. We’ll have to use a different, in-focus texture for the raindrops themselves. Blur is an expensive operation, and doing it in real time should be avoided – but since the raindrops are small, we can make that texture small as well.


Conclusion
To make realistic looking effects like raindrops we need to consider many tricky details. Taking apart a real world effect first is the key to every effect recreation. Once we know how things work in reality, we can map that behavior to the virtual world. With WebGL we can aim for good performance for this kind of simulation (we can use hardware accelerated graphics) so it’s a good choice for this kind of effect.
We hope you enjoyed this experiment and find it inspiring!


This is super awesome, really big one, thanks for sharing.
I was just shocked when i saw the demo !
Keep it up !
It very able to use hardware accelerated graphics,just looks awesome. thanks for share…
Si sería cool tener en nieve o frio!!!
It’s really very Cool, I first time find out these 2d or 3d effects. I am definitely going to use it on my projects.
This is really cool idea for any website designer and here you have shown different rain effects and also given a guide about how to create it so i will definitely use this code to make a rain effect on my website.
But first i want to use this for my blog on other site. So is it possible to use this effect on any blog??
It’s really nice but after download i got this error on my local computer:
Unhandled promise rejection DOMException: Failed to execute ‘texImage2D’ on ‘WebGLRenderingContext’: Tainted canvases may not be loaded.(…)
what’s this?
How to handle resizing? If your browser window is not full screen and you try to expand the window, the city graphic and rain effect don’t resize, so you’re left with a weird broken image on the resized parts of the window.
Any solution to this?!
PS Thanks for this effect, it’s beautiful!
@Norway
Yes thats what i’m looking for too, when we load the webpage without fullscreen and then resize it to fullscreen, the canvas size is fixed so that it not gonna resize automatically
I found this solution but i dont know how to implement this
http://htmlcheats.com/html/resize-the-html5-canvas-dyamically/
It doesn’t seem to be working for me. The demo does though! any ideas?
I spend some time over understanding this code so I may be able to help you …
feel free to contact me and tell me your problem I may be able to help
the_lost_of_jamy@yahoo.com
+984106769
good luck
cool! awesome experiment. (y)
yeah, code is very difficult to learn
…this code seems to be for Gulus
awesome! but why i cant run in local ?
Awesome project
The effects is awesome, but the js codes are really unreadable for learners. 7000+ codes for a rainy effect is costly. Better to separate it into several independent files IMHO.
Oops, I didn’t see the github link in the end of article. The codes are readable. Nice post again!
hi … thanx for this Rain & Water Effect Experiments …. it is very nice and wonderful ….. plzz can i run it offline
sory for bad english ….im love the rain and winter … this playground achieved my dreams
Great effect, terrible code. Update: Looking more into the code, and it’s not terrible! I’m using this in a project at work, I’ll try add to the docs to make it easier for other people to use. Thanks for sharing!
Hi
have been experimenting with this, trying to use different background images – but as you can only seem to have a file named texture-rain-bg.png, and it also seems that you cannot specify a “dedicated” folder to set the path to. It means I can only have ONE background image.
Is there anyway to CHANGE the background image dynamically using php????
this is what I was tryng to do
from rain.js
change
{name:”textureRainBg”,src:”simpleSite/rain/weather/texture-rain-bg.png”}
to
{name:”textureRainBg”,src:”simpleSite/rain/jazzclub/texture-rain-bg.png”}
but this FAILS, you get no image uploading.
All I am doing is creating a dynamic page that reads the PATH of the URLin ph via $_SERVER[‘SERVER_NAME]
depending on the DOMAIN name/ URL show a different image for the background
here is my 2 domains
http://jazzlovers.uk => /weather/texture-rain-bg.png == Works OK
and
http://jazzlovers.club => /jazzclub/texture-rain-bg.png == FAILS ????
Help
with thanks in advance.
madesignUK
Hey i just saw your web page. And i was wondering if you could help me change the background, cause i replace the texture-rain-bg.png and it doesnt look as good as your page. i get all the drops pixelated
hi there, I checked your websites they are perfect
I don’t have answer to your question but for a time I had a problem : new chrome and Mozilla versions throw error and doesn’t show the rain … I checked your website has the same problem , it works good on edge but not no others… so I wanted to share the solution I found … hop it helps you
I find it here :
https://github.com/codrops/RainEffect/issues/7
it seems that the end lines of the index.min.js JavaScript throws an error which in previous versions of chrome it caused an alert but in new versions it cause an error which interrupt the site so:
go to your index.min.js file and fine ( ctrl + f ) this code :
function o(t,e,i){var r=t.createTexture();return l(t,i),t.bindTexture(t.TEXTURE_2D,r),t.texParameteri(t.TEXTURE_2D,t.TEXTURE_WRAP_S,t.CLAMP_TO_EDGE),t.texParameteri(t.TEXTURE_2D,t.TEXTURE_WRAP_T,t.CLAMP_TO_EDGE),t.texParameteri(t.TEXTURE_2D,t.TEXTURE_MIN_FILTER,t.LINEAR),t.texParameteri(t.TEXTURE_2D,t.TEXTURE_MAG_FILTER,t.LINEAR),null==e?r:(u(t,e),r)}
and replace it with this :
function o(t,e,i){var r=t.createTexture();l(t,i);t.bindTexture(t.TEXTURE_2D,r);t.texParameteri(t.TEXTURE_2D,t.TEXTURE_WRAP_S,t.CLAMP_TO_EDGE);t.texParameteri(t.TEXTURE_2D,t.TEXTURE_WRAP_T,t.CLAMP_TO_EDGE);t.texParameteri(t.TEXTURE_2D,t.TEXTURE_MIN_FILTER,t.LINEAR);t.texParameteri(t.TEXTURE_2D,t.TEXTURE_MAG_FILTER,t.LINEAR);if ( e == null ){return r;}else{u(t, e)}return r;}
after that save your file make sure you clear the cache of your browser and test after that
feel free to ask if have any question : the_lost_of_jamy@yahoo.com , +989364106769
by the way it wasn’t my solution, as I mentioned I found it here:
https://github.com/codrops/RainEffect/issues/7
but the solution in link is for the index.js and I made changes to it so it works in index.min.js
because in default this rain effect example uses index.min.js not index.min.js
good luck.
I’m trying to integrate this into an Apache Cordova app, and i tried just opening one of the index.html files (downloaded off GitHub) but all it shows is a black screen (apart from the links and icons). No background, no rain. I don’t know how to fix this. I tried gulp (gulpfile, so i figured) but that didn’t work either. (And i can’t even have gulp in a Cordova app) How am i supposed to fix this?
I Live U :v
Impressive!
INCREIBLE!
anyone know how to make the droplets transparent in IE11?
how to change the background image? Automatically loaded from somewhere …
you will find this in the loadTextures() functions:
[…]
{name:”textureRainFg”,src:”img/weather/texture-rain-fg.png”},
{name:”textureRainBg”,src:”img/weather/texture-rain-bg.png”},
[…]
hi, great demo, but why a similar technique to normal mapping and not just normal mapping??
thank you
Hi , there
Excuse me if I can’t write English well, I am from Iran.
I Have seen a lot of different websites and their graphics and their effects
but after seeing what u have done, I can say about 45min I was looking at this raining you made without a blink
It is awesome , great , and a lot more…
I never put comments or likes , but this time I couldn’t stop my self
I am impressed , your work is admirable , you make a real raining algorithm , code and ….
its not gif or images its coooodee , I can’t believe , its greaaaat
I hop the bests for you from God
Somehow it stopped working, not working on chrome and firefox, works on internet explorer and edge.
Experiencing the same issue. Was searching all over for answers as to why I’m getting the error: “Uncaught (in promise) TypeError: Failed to execute ‘texImage2D’ on ‘WebGLRenderingContext’: No function was found that matched the signature provided.” when none of the files have changed and it was working a few days ago. However, the demo hosted on this site still works but the console is logging the same error message I’m receiving.
did you open the files with your localhost?
Nice work!
not working on chrome
notify from console:
index.min.js:7 WebGL: INVALID_VALUE: vertexAttribPointer: index out of range
hi every one, I had the same problem but I found the solution… I find it here :
https://github.com/codrops/RainEffect/issues/7
it seems that the end lines of the index.min.js JavaScript throws an error which in previous versions of chrome it caused an alert but in new versions it cause an error which interrupt the site so:
go to your index.min.js file and fine ( ctrl + f ) this code :
function o(t,e,i){var r=t.createTexture();return l(t,i),t.bindTexture(t.TEXTURE_2D,r),t.texParameteri(t.TEXTURE_2D,t.TEXTURE_WRAP_S,t.CLAMP_TO_EDGE),t.texParameteri(t.TEXTURE_2D,t.TEXTURE_WRAP_T,t.CLAMP_TO_EDGE),t.texParameteri(t.TEXTURE_2D,t.TEXTURE_MIN_FILTER,t.LINEAR),t.texParameteri(t.TEXTURE_2D,t.TEXTURE_MAG_FILTER,t.LINEAR),null==e?r:(u(t,e),r)}
and replace it with this :
function o(t,e,i){var r=t.createTexture();l(t,i);t.bindTexture(t.TEXTURE_2D,r);t.texParameteri(t.TEXTURE_2D,t.TEXTURE_WRAP_S,t.CLAMP_TO_EDGE);t.texParameteri(t.TEXTURE_2D,t.TEXTURE_WRAP_T,t.CLAMP_TO_EDGE);t.texParameteri(t.TEXTURE_2D,t.TEXTURE_MIN_FILTER,t.LINEAR);t.texParameteri(t.TEXTURE_2D,t.TEXTURE_MAG_FILTER,t.LINEAR);if ( e == null ){return r;}else{u(t, e)}return r;}
after that save your file make sure you clear the cache of your browser and test after that
feel free to ask if have any question : the_lost_of_jamy@yahoo.com , +989364106769
by the way it wasn’t my solution, as I mentioned I found it here:
https://github.com/codrops/RainEffect/issues/7
but the solution in link is for the index.js and I made changes to it so it works in index.min.js
because in default this rain effect example uses index.min.js not index.min.js
good luck.
Hey there
Thanks for this awesome work! It helped me a lot in a project I am currently working on. Everything is clear so far, but I do not get one important thing. How can I access the updateWeather() function inside another script that is loaded after your script? I think it is a scoping problem or something like that because this project uses require and stuff. It would be lovely if someone can give me a hint 🙂 * greetings and thanks for all your awesome work
hi, I hope u see my answer … I had the same problem but I found the solution hop it helps you
make an script before the rain script and make a global variable in it like this
vat test
then find the updateWeather function in rain script and make it like this :
test=function updateWeather()
{…}
if you are working on index.min.js find h() function and change it like this :
test=function h()
from now where ever you want to use updateWeather just type test();
but !!!!! be sure to also change the name of updateWeather function in setupWeather() function in the rain script (index.js) and change it to test(); you should find two : in lines 11786 , 11788 change both of them to test();
if you are working on index.min.js instead of finding setupWeather() to make the two changes look for
function u() and find two h() there and change them to test();
feel free to ask question : the_lost_of_jamy@yahoo.com , +989364106769
it’s so amazing! however, the demo that I downloaded couldn’t work well on chrome. Edge is ok. It’s time to go to sleep.
good work
Great work 🙂
Any update for snowing version?
Hats off 4 u
hey i have a problem when i am trying to run it offline it loaded only a blank black window but no any rain effect…help me…
Hi, I’am getting this error and i worked too hard to understand andsolve it but there is no luck 🙁
this is giving me on console thousends of error.
But everything is still working as it should be, just this error giving me irritation and want to solve it, please help.
I’am working on localhost and it’s fine on chrome, mozilla, edge.
Cannot read property ‘fg’ of undefined
at s.onUpdate [as _onUpdate] (index.min.js:8)
at s.l._callback (index.min.js:7)
at s.c.render (index.min.js:4)
at Object.l.render (index.min.js:7)
at Object.R._updateRoot.C.render (index.min.js:7)
at Object.l.dispatchEvent (index.min.js:7)
at v (index.min.js:7)
Rain & Water Effect Experiments not working please help me.
hey zip fe not working
Source code doesn’t work 🙁
Run in localhost
love the code and the effect.. s’rsly… just wondering why it reacts to my mouse ? .. ie it ‘shifts’ a little to the left/right up/down.. is this because of different screen sizes than it was optimized for ? thanks adec
Superb work indeed!
Anyway, in Chrome (Versión 62.0.3202.94 (64 bits)) I get a crash due to the following console report:
Uncaught (in promise) TypeError: Cannot read property ‘VERTEX_SHADER’ of null
at Object.o [as createProgram] (codrops.min.js:3)
at o.createProgram (codrops.min.js:3)
at o.init (codrops.min.js:3)
at new o (codrops.min.js:3)
at init (codrops.min.js:3)
at new i (codrops.min.js:3)
at i (codrops.min.js:3)
at codrops.min.js:3
at
Any help on this?
Here again, writing now from Apple side.
I get the following two warnings from Safari (10.1.1 (12603.2.4)):
WebGL: INVALID_VALUE: enableVertexAttribArray: index out of range, at 4795:179 of codrops.min.js
WebGL: INVALID_VALUE: vertexAttribPointer: index out of range, at 4795:205 of codrops.min.js
Any advice on this?
Would have loved an explanation of how to make the drops etc.. It now stops after the tutorial on the basic triangle render
Thank you!!! amazing work you did!!!
I made some changes and created a WordPress Plugin it: https://github.com/jhotadhari/rain-effect
all the best and sunshine
Tutorial video pleeaasee!
Any tips on how to make the rain drops blurry? I suppose this would involve running the rain drop texture through some blur function.
I try to use webpack to bundle the source code. But it is not working. I am new to JS and webgl. Can someone give me a suggestion? Thanks.