From our sponsor: Leverage AI for dynamic, custom website builds with ease.
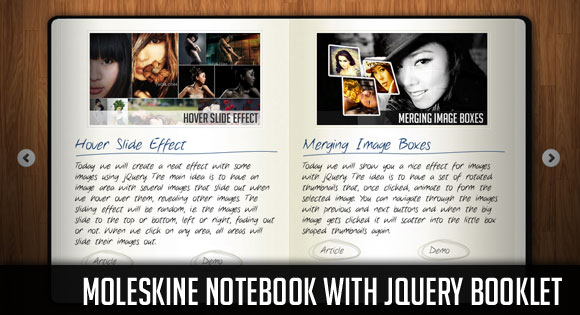
Today we will show you how to use and customize the brilliant jQuery Booklet Plugin by talented Will Grauvogel. We will create a virtual Moleskine notebook with latest posts from the blog.
You can find the beautiful Moleskine Photoshop file by Dennern at deviantart here:
My Moleskine (PSD)
For the navigation arrows we used the pixel perfect PSD provided by premiumpixels.com under
Simple Little Arrows (PSD)
Ok, so let’s get started!
The Markup
The HTML structure will be made up of the booklet plugin markup which includes the div with the id “mybook”. We will also add some navigation items and a loading element which we want to show while the content of the book is loading:
<div class="book_wrapper">

	<a id="next_page_button"></a>
	<a id="prev_page_button"></a>

	<div id="loading" class="loading">Loading pages...</div>

	<div id="mybook" style="display:none;">
		<div class="b-load">

			<div>
				<img src="images/1.jpg" alt=""/>
				<h1>Slider Gallery</h1>
				<p>This tutorial is about creating a creative gallery...</p>
				<a href="#" class="article">Article</a>
				<a href="#" class="demo">Demo</a>
			</div>

			<div>
				...
			</div>

		</div>
	</div>
</div>
Each page of the booklet will be placed in a div element inside of the element with the class “b-load”.
Since the plugin allows us to use custom buttons for flipping the pages, we will configure the plugin to use our arrow anchors.
Let’s take a look at the style.
The CSS
For the styling we will simply create a “skin” for the plugin, i.e. a stylesheet that will overwrite some style properties that come with the plugin stylesheet (so be sure to place it after the inclusion of our customization).
We will start by adapting the “booklet” class and giving it some shadow and rounded borders:
.booklet{
	-moz-box-shadow:0px 0px 1px #fff;
	-webkit-box-shadow:0px 0px 1px #fff;
	box-shadow:0px 0px 1px #fff;
	-moz-border-radius:10px;
	-webkit-border-radius:10px;
	border-radius:10px;
}
We want to add a background image to the left and the right page, so that it looks more like a real book:
.booklet .b-wrap-left{
	background:#fff url(../images/left_bg.jpg) no-repeat top left;
	-webkit-border-top-left-radius: 10px;
	-webkit-border-bottom-left-radius: 10px;
	-moz-border-radius-topleft:10px;
	-moz-border-radius-bottomleft: 10px;
	border-top-left-radius: 10px;
	border-bottom-left-radius: 10px;
}
.booklet .b-wrap-right{
	background:#efefef url(../images/right_bg.jpg) no-repeat top left;
	-webkit-border-top-right-radius: 10px;
	-webkit-border-bottom-right-radius: 10px;
	-moz-border-radius-topright: 10px;
	-moz-border-radius-bottomright: 10px;
	border-top-right-radius: 10px;
	border-bottom-right-radius: 10px;
}
We will also style the page numbers and adding some decent top border:
.booklet .b-counter{
	bottom:10px;
	position:absolute;
	display:block;
	width:90%;
	height:20px;
	border-top:1px solid #ddd;
	color:#222;
	text-align:center;
	font-size:12px;
	padding:5px 0 0;
	background:transparent;
	-moz-box-shadow:0px -1px 1px #fff;
	-webkit-box-shadow:0px -1px 1px #fff;
	box-shadow:0px -1px 1px #fff;
	opacity:0.8;
}
In the HTML stucture, we added a wrapper around the booklet, so that we can use a moleskine background image:
.book_wrapper{
	margin:0 auto;
	padding-top:50px;
	width:905px;
	height:540px;
	position:relative;
	background:transparent url(../images/bg.png) no-repeat 9px 27px;
}
We want to add a hand-drawn line beneath the heading on each page:
.book_wrapper h1{
	color:#13386a;
	margin:5px 5px 5px 15px;
	font-size:26px;
	background:transparent url(../images/h1.png) no-repeat bottom left;
	padding-bottom:7px;
}
The paragraphs and the links will have the following style:
.book_wrapper p{
	font-size:16px;
	margin:5px 5px 5px 15px;
}
.book_wrapper a.article,
.book_wrapper a.demo{
	background:transparent url(../images/circle.png) no-repeat 50% 0px;
	display:block;
	width:95px;
	height:41px;
	text-decoration:none;
	outline:none;
	font-size:16px;
	color:#555;
	float:left;
	line-height:41px;
	padding-left:47px;
}
.book_wrapper a.demo{
	margin-left:50px;
}
.book_wrapper a.article:hover,
.book_wrapper a.demo:hover{
	background-position:50% -41px;
	color:#13386a;
}
We will give the images a slight touch by adding a light border with a white box shadow, creating a slightly engraved look:
.book_wrapper img{
	margin:10px 0px 5px 35px;
	width:300px;
	padding:4px;
	border:1px solid #ddd;
	-moz-box-shadow:1px 1px 1px #fff;
	-webkit-box-shadow:1px 1px 1px #fff;
	box-shadow:1px 1px 1px #fff;
}
The border color on the right page needs to be a little bit darker:
.booklet .b-wrap-right img{
	border:1px solid #E6E3C2;
}
For the navigation arrows we will use a sprites image that contains all four arrow types:
a#next_page_button,
a#prev_page_button{
	display:none;
	position:absolute;
	width:41px;
	height:40px;
	cursor:pointer;
	margin-top:-20px;
	top:50%;
	background:transparent url(../images/buttons.png) no-repeat 0px -40px;
}
a#prev_page_button{
	left:-30px;
}
a#next_page_button{
	right:-30px;
	background-position:-41px -40px;
}
a#next_page_button:hover{
	background-position:-41px 0px;
}
a#prev_page_button:hover{
	background-position:0px 0px;
}
The loading element will have rounded borders and be semi-transparent. We will position it absolutely on the right side of the book:
.loading{
	width:160px;
	height:56px;
	position: absolute;
	top:50%;
	margin-top:-28px;
	right:135px;
	line-height:56px;
	color:#fff;
	padding-left:60px;
	font-size:15px;
	background: #000 url(../images/ajax-loader.gif) no-repeat 10px 50%;
	opacity: 0.7;
	z-index:9999;
	-moz-border-radius:20px;
	-webkit-border-radius:20px;
	border-radius:20px;
}
And that was all the style! Let’s add some magic!
The JavaScript
In the jQuery we will simply call the plugin after all the images in the book are loaded. Check out all the options here:
Booklet jQuery Plugin Options
var $mybook 		= $('#mybook');
var $bttn_next		= $('#next_page_button');
var $bttn_prev		= $('#prev_page_button');
var $loading		= $('#loading');
var $mybook_images	= $mybook.find('img');
var cnt_images		= $mybook_images.length;
var loaded			= 0;
//preload all the images in the book,
//and then call the booklet plugin

$mybook_images.each(function(){
	var $img 	= $(this);
	var source	= $img.attr('src');
	$('<img/>').load(function(){
		++loaded;
		if(loaded == cnt_images){
			$loading.hide();
			$bttn_next.show();
			$bttn_prev.show();
			$mybook.show().booklet({
				name:               null,
				// name of the booklet to display in the document title bar
				width:              800,
				// container width
				height:             500,
				// container height
				speed:              600,
				// speed of the transition between pages
				direction:          'LTR',
				// direction of the overall content
				// organization, default LTR, left to right, can be
				// RTL for languages which read right to left
				startingPage:       0,
				// index of the first page to be displayed
				easing:             'easeInOutQuad',
				// easing method for complete transition
				easeIn:             'easeInQuad',
				// easing method for first half of transition
				easeOut:            'easeOutQuad',
				// easing method for second half of transition

				closed:             true,
				// start with the book "closed", will add empty
				// pages to beginning and end of book
				closedFrontTitle:   null,
				// used with "closed", "menu" and "pageSelector",
				// determines title of blank starting page
				closedFrontChapter: null,
				// used with "closed", "menu" and "chapterSelector",
				// determines chapter name of blank starting page
				closedBackTitle:    null,
				// used with "closed", "menu" and "pageSelector",
				// determines chapter name of blank ending page
				closedBackChapter:  null,
				// used with "closed", "menu" and "chapterSelector",
				// determines chapter name of blank ending page
				covers:             false,
				// used with  "closed", makes first and last pages
				//into covers, without page numbers (if enabled)

				pagePadding:        10,
				// padding for each page wrapper
				pageNumbers:        true,
				// display page numbers on each page

				hovers:             false,
				// enables preview pageturn hover animation,
				// shows a small preview of previous or next page on hover
				overlays:           false,
				// enables navigation using a page sized overlay,
				// when enabled links inside the content will
				// not be clickable
				tabs:               false,
				// adds tabs along the top of the pages
				tabWidth:           60,
				// set the width of the tabs
				tabHeight:          20,
				// set the height of the tabs
				arrows:             false,
				// adds arrows overlayed over the book edges
				cursor:             'pointer',
				// cursor css setting for side bar areas

				hash:               false,
				// enables navigation using a hash string,
				// ex: #/page/1 for page 1, will affect
				// all booklets with 'hash' enabled
				keyboard:           true,
				// enables navigation with arrow keys
				// (left: previous, right: next)
				next:               $bttn_next,
				// selector for element to use as click
				// trigger for next page
				prev:               $bttn_prev,
				// selector for element to use as click
				// trigger for previous page

				menu:               null,
				// selector for element to use as the menu area,
				// required for 'pageSelector'
				pageSelector:       false,
				// enables navigation with a dropdown menu of pages,
				// requires 'menu'
				chapterSelector:    false,
				// enables navigation with a dropdown menu of chapters,
				// determined by the "rel" attribute, requires 'menu'

				shadows:            true,
				// display shadows on page animations
				shadowTopFwdWidth:  166,
				// shadow width for top forward anim
				shadowTopBackWidth: 166,
				// shadow width for top back anim
				shadowBtmWidth:     50,
				// shadow width for bottom shadow

				before:             function(){},
				// callback invoked before each page turn animation
				after:              function(){}
				// callback invoked after each page turn animation
			});
			Cufon.refresh(); // if you want to use cufon
		}
	}).attr('src',source);
});
For cufonizing the content in the book, we will add the following lines to the head of our HTML:
<script src="cufon/cufon-yui.js" type="text/javascript"></script>
<script src="cufon/ChunkFive_400.font.js" type="text/javascript"></script>
<script src="cufon/Note_this_400.font.js" type="text/javascript"></script>
<script type="text/javascript">
	Cufon.replace('h1,p,.b-counter');
	Cufon.replace('.book_wrapper a', {hover:true});
	Cufon.replace('.title', {textShadow: '1px 1px #C59471', fontFamily:'ChunkFive'});
	Cufon.replace('.reference a', {textShadow: '1px 1px #C59471', fontFamily:'ChunkFive'});
	Cufon.replace('.loading', {textShadow: '1px 1px #000', fontFamily:'ChunkFive'});
</script>
And that’s all! We hope you liked this tutorial, enjoyed it and find it useful 🙂


Great article and plugin, I like to use pdf in pages, is possible?
Thanks for sharing this plugins works very well and it works in ie6.
Thanks a lot MARY LOU brilliant tut, but I wanna ask you. Could you also comment CSS and HTML part of your tuts and includ head tag in HTML part?
Is it possible to link internally? Meaning, can I use a link on page and have it flip to another page when I click the link?
Hi,
Thanks for this tuto, it’s a great one. One thing I want to know. How could I replace the page numbers by a custom text in the page selector menu?
Thanks for your help
I think this tutorial is brilliant and it gave me enough knowledge to base my entire website on jquery booklet:
http://www.thechristeningphotographer.com.au/pages/christening-photographer-testimonials.html
ive been trying to install something like this in my drupal theme, im at a loss, no idea where to start
@VOUGHNDUTCH I am working on a Drupal module usinf jQuery booklet.
Drupal 7 version working, still needs some cleanup. After finishing Drupal 7 version I will do a back-port to Drupal 6.
I will inform you here about progress.
@LUCH KLOOSTER you are a Godsend if you need any help or a paypal donation I would be more than happy to oblige. I get everything working fine in dream weaver but when I try to move it to drupal wont work tried all sorts of injectors and loaders going crazy over here.
Hi, It´s amazing this tutorial and the Booklet Jquery Pugin. I´m working in an exposition and I would like to know if is possible 1 page instead 2 (Like the google book: http://www.20thingsilearned.com/es-ES). Thanks for your help.
How i can change font?
Hey guys,
Great stuff, I am kind of doing a catalogue based on this, however would like to know if I can just make them as HTML separate pages and load each as the pages are flipped? That would be great. I don’t know if the HASH tag can help me on this one, but would appreciate some input. It’s just that the booklet is 14 pages or so, and loading all those assets at once is insane.
To the guy at the top, you need to declare the fonts where you intend to use it.
Hi Everyone,
Will like to customise the background image (bg.png) and scale the width and height. try to change the .book_wrapper but with no success.
any tips, pointers and directions highly welcome
Hi Mary Lou,
Can we show only next button when user is viewing cover page but not the previous button image?
And on last cover page can user move directly to first cover page on click of previous image button?
Any suggestions would be helpful.
Thanks!
@Chris Reynolds
Hi Chris, Were you able to achieve the loading or opening a specific page of the booklet via a url link?
I am trying to implement this on my website. –> having a url link to the book to open a specific page or chapter of it.
Anybody with the clue? Please help!
God blesses!!!
Best regards,
Sanyaade
Hi Mary Lou..!
You did a great work!
I would like to ask for your help on how to add a thumbnail scroller below the notebook. Somewhat similar to Google’s 20 things I Learned: http://www.20thingsilearned.com/en-US/home.
Looking forward to your response. Thanks!
nice one
Great work , I Love it
How can I make a callback on just one specific page, not all pages?
Hi, how can i implement a PHP Pagination with this?
This Booklet plugin and the plugin on http://www.webdesignerwall.com/demo/jquery/simple-slide-panel.html are not working together. Can you help me Miss Mary ?
IE 8 makes the text on the right hand page lose it’s anti alias…is this something to do with fadeIn? Would be perfect if not for this bug…does anyone knowof a fix? Thanks!
I liked your Notebook. Downloaded and installed. To my surprise it is not working on the following browsers viz:IE, Chrome,Safari. It works on Firefox.
Please advise and guide me.
Thanks
Hello. I want to show wordpress posts in the booklet plugin page flip effect. Please advise best way to use this jquery booklet code, possibly as a theme to display posts in the book pages.
thanks!
wow.. that was so close, but not yet..
one thats important, its miss the page jumper. maybe add some navigation could be cool :p
Incredible!!! Very impessive!!! Never hoped to find soon such a thing as an open source sample.
Can any one let me know where to control the number of pages to display ? I want to display like 4 or 5 pages only ^^
Thanks Mary,
nice things. Just wanted to know if we can play with the CSS/JS of the plugin to have left and right pages of different widths instead of having the same width. Like if left page to be 20% of entire book and right page to be of rest 80%.
Thanks!
Great work!
Is anybody can tell me how to turn pages with finger on ipad.
I’m trying the examples on booklet site with the ipad , but it doesn’t work.
http://builtbywill.com/code/booklet/examples/
Many thanks
RV
Thanks for the tutorial n code. But if we want to add new function like share to facebook and print the book, can it be done?
I found an issue. If i delete all images, this plugin does not work
Please kindly check again
Thanks
I love this script but I have the same issue as Hoang Minh. If there are no images, it just keeps turning the loading icon… I wish I knew enough javascript to sort that out because I’d like to keep the preloading! (I’m adding it to a CMS and won’t know in advance how many if any images there will be).
Please help…
Hi,
great script and demo, I just have a question, is it possible to remove the left or right navigation arrows when you are at the beginning or end of the book?
Many Thanks and Happy Christmas
Hi, great tutorial.
I would like to use this on a project of mine. I design and print real leaflets/booklets and want to add this plugin to my website, allowing my customers to pay a fee, upload their pages and have an online leaflet.
What I have in mind only uses one plugin/application and I think the license is okay for that but what if I sold a webpage to a customer that contains this plugin, and then sold another webpage to another customer with this plugin. Is that allowed?
I love seeing demos of Jquery templates like these! They are so awesome and make websites look professional! I’ve been wanting to put them on my blog (I have a Blogger), but unforunately I’m not quite sure how to put this template on it. Can anyone help me? Where in my Blogger template do I add “the Markups”, “the CSS”, and “the JavaScript” as shown in this article? I’ve tried for hours for figuring how to put this template on Blogger and I even searched up how to put it on, but nothing seems to help me. I even downloaded this template, but have no idea how to put it on my blogger. Can anyone please help me by providing easy “baby” steps for adding this template on Blogger?
Thanks,
Yasmeen
Hi! I really like it, but as I know nothing about javascript I’m having problems trying to get rid of the images preloads. Can anybody tell me exactly which lines do I have to erase?
Thanks!
Hi Mary,
Thankyou for this wonderful plugin. I’ve been wanting to create a book effect for my site for ages.
I just wondered is there a way to automatically center the book when its closed?
Thankyou
Judith
Rokaj curo 🙂
Has anyone tried using a curved background image as in this file?
http://www.purdue.edu/discoverypark/viewbook/overview/
Seems a lot harder than using a straigh page…