From our sponsor: Leverage AI for dynamic, custom website builds with ease.
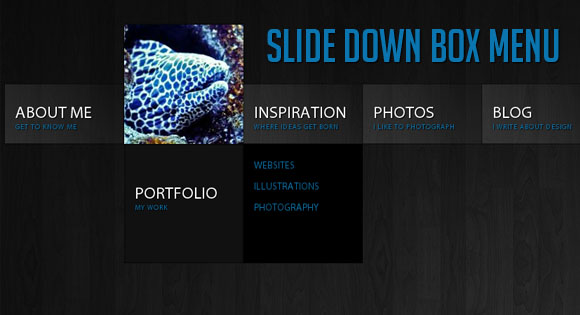
In this tutorial we will create a unique sliding box navigation. The idea is to make a box with the menu item slide out, while a thumbnail pops up. We will also include a submenu box with further links for some of the menu items. The submenu will slide to the left or to the right depending on which menu item we are hovering.
We will be using the jQuery Easing Plugin and some beautiful photos by tibchris.
The Markup
For the HTML structure we will be using an unordered list where each menu item will contain the main link item and a div element for the submenu:
<ul id="sdt_menu" class="sdt_menu">
	<li>
		<a href="#">
			<img src="images/1.jpg" alt=""/>
			<span class="sdt_active"></span>
			<span class="sdt_wrap">
				<span class="sdt_link">Portfolio</span>
				<span class="sdt_descr">My work</span>
			</span>
		</a>
		<div class="sdt_box">
			<a href="#">Websites</a>
			<a href="#">Illustrations</a>
			<a href="#">Photography</a>
		</div>
	</li>
	...
</ul>
If there is no submenu, the div can simply be left out. The image will not be shown in the beginning since we will set its width and height to 0 in the CSS.
Let’s take a look at the style.
The CSS
We will start by styling the unordered list:
ul.sdt_menu{
	margin:0;
	padding:0;
	list-style: none;
	font-family:"Myriad Pro", "Trebuchet MS", sans-serif;
	font-size:14px;
	width:1020px;
}
Genrally, we want to remove any default text-decoration and outline for all the link elements in our menu:
ul.sdt_menu a{
	text-decoration:none;
	outline:none;
}
Our list items will be floating left and have the position relative since we will want to use absolute positioning for the elements inside. If we wouldn’t set that, absolute positioned elements would be relative to the whole page:
ul.sdt_menu li{
	float:left;
	width:170px;
	height:85px;
	position:relative;
	cursor:pointer;
}
The styling for the main link element where we have our two spans for title and description will be styled as follows:
ul.sdt_menu li > a{
	position:absolute;
	top:0px;
	left:0px;
	width:170px;
	height:85px;
	z-index:12;
	background:transparent url(../images/overlay.png) no-repeat bottom right;
	-moz-box-shadow:0px 0px 2px #000;
	-webkit-box-shadow:0px 0px 2px #000;
	box-shadow:0px 0px 2px #000;
}
Notice the z-index: we will be defining a stacking order for all the important elements, so that the right ones stay on top.
We are using a background image that creates a glass like effect with a semi-transparent gradient. When you use some background pattern (like the wood in the demo) it creates a beautiful effect. Make sure to try out different textures – it just looks amazing!
You can also play with the shadows – changing the values to 2px 2px 6px #000 inset will give you a very nice effect.
The image will be styled as follows:
ul.sdt_menu li a img{
	border:none;
	position:absolute;
	width:0px;
	height:0px;
	bottom:0px;
	left:85px;
	z-index:100;
	-moz-box-shadow:0px 0px 4px #000;
	-webkit-box-shadow:0px 0px 4px #000;
	box-shadow:0px 0px 4px #000;
}
We want to animate the image to come up from the bottom, that’s why we position it absolutely using “bottom” as reference point. We also add some neat box shadow. The first two values are zero, making the shadow spread evenly around the image. We used this as well in the link element. This even shadow can be used as a trick, whenever you want to create a light border effect. The advantage is that shadows are not really there – you don’t need to consider it in your width or height calculations in elements. The current disadvantage is that CSS3 is not supported in IE.
The wrapper for the title and description spans will have this style:
ul.sdt_menu li span.sdt_wrap{
	position:absolute;
	top:25px;
	left:0px;
	width:170px;
	height:60px;
	z-index:15;
}
If you have some larger texts, you will need to adapt these values. Make sure that the adapted values fit well with the animation values in the JavaScript, too.
Next, we define the style for the gray box that slides down. We give it a height of 0 and position it already in a way that we just need to increase its height in the animation:
ul.sdt_menu li span.sdt_active{
	position:absolute;
	background:#111;
	top:85px;
	width:170px;
	height:0px;
	left:0px;
	z-index:14;
	-moz-box-shadow:0px 0px 4px #000 inset;
	-webkit-box-shadow:0px 0px 4px #000 inset;
	box-shadow:0px 0px 4px #000 inset;
}
The common styles for the spans and links in the boxes will be the following:
ul.sdt_menu li span span.sdt_link,
ul.sdt_menu li span span.sdt_descr,
ul.sdt_menu li div.sdt_box a{
	margin-left:15px;
	text-transform:uppercase;
	text-shadow:1px 1px 1px #000;
}
The title and description will be styled as follows:
ul.sdt_menu li span span.sdt_link{
	color:#fff;
	font-size:24px;
	float:left;
	clear:both;
}
ul.sdt_menu li span span.sdt_descr{
	color:#0B75AF;
	float:left;
	clear:both;
	width:155px;
	font-size:10px;
	letter-spacing:1px;
}
The submenu box will initially be hidden under the gray box. We will then animate it to the right or to the left depending on where we are. If we, for example, hover the last element, we want to animate that submenu box to the left, in all the other cases we want to animate it to the right.
ul.sdt_menu li div.sdt_box{
	display:block;
	position:absolute;
	width:170px;
	overflow:hidden;
	height:170px;
	top:85px;
	left:0px;
	display:none;
	background:#000;
}
ul.sdt_menu li div.sdt_box a{
	float:left;
	clear:both;
	line-height:30px;
	color:#0B75AF;
}
The first link in the submenu should have a top margin:
ul.sdt_menu li div.sdt_box a:first-child{
	margin-top:15px;
}
ul.sdt_menu li div.sdt_box a:hover{
	color:#fff;
}
And that’s all the style! Let’s add the magic!
The JavaScript
When we enter with the mouse on a list element we enlarge the image, and show both, the sdt_active span and the sdt_wrap span. If the element has a submenu (sdt_box), then we slide it to the side. If the element is the last one in the menu we slide the submenu box to the left, otherwise to the right:
$(function() {
	$('#sdt_menu > li').bind('mouseenter',function(){
		var $elem = $(this);
		$elem.find('img')
			 .stop(true)
			 .animate({
				'width':'170px',
				'height':'170px',
				'left':'0px'
			 },400,'easeOutBack')
			 .andSelf()
			 .find('.sdt_wrap')
			 .stop(true)
			 .animate({'top':'140px'},500,'easeOutBack')
			 .andSelf()
			 .find('.sdt_active')
			 .stop(true)
			 .animate({'height':'170px'},300,function(){
			var $sub_menu = $elem.find('.sdt_box');
			if($sub_menu.length){
				var left = '170px';
				if($elem.parent().children().length == $elem.index()+1)
					left = '-170px';
				$sub_menu.show().animate({'left':left},200);
			}
		});
	}).bind('mouseleave',function(){
		var $elem = $(this);
		var $sub_menu = $elem.find('.sdt_box');
		if($sub_menu.length)
			$sub_menu.hide().css('left','0px');

		$elem.find('.sdt_active')
			 .stop(true)
			 .animate({'height':'0px'},300)
			 .andSelf().find('img')
			 .stop(true)
			 .animate({
				'width':'0px',
				'height':'0px',
				'left':'85px'},400)
			 .andSelf()
			 .find('.sdt_wrap')
			 .stop(true)
			 .animate({'top':'25px'},500);
	});
});
And that’s it! We hope you liked this little menu and find it useful!
P.S. It looks very juicy in Google Chrome!


That’s really impressive.
incredible like others tuts .
Do more and more and more … ^^
Real thanks to your job :).
great menu, i love it!
Really awesome, great job.
Thanks for share.
That’s amazing. You’re like a magician that makes incredible magic tricks with jQuery. Very impressive.
Good idea and realization
Just curious – instead of using bind(), couldn’t you use .hover()?
Anyways, great job.
Also, the navigation is rendered useless if user has javascript off.
Great effect, so smooth you could swear it was Flash. Thanks for sharing!
“we doan needno steenkeen flash…”
Superb: Concept; Production; Follow-thru
Thanks!
Pretty nice work. I love this blog 🙂
Really nice. Very useful for product categories too 😀
Added to my linklist 🙂
Thanks a lot for the tutorial! This will definitely be going on the redesign of my website.
My site’s turning into all your ideas. WOW!
OMG this is one of the most attractive navigation systems I’ve seen!
WOW! jQuery Rocks!
Wow. great.
MAry, have you ever thought about creating a star rating widget?
Thank you all for your great comments! We are so glad you like it!! 🙂
@Carmen A star rating widget seems like a nice idea, we’ll think about it for a future post!
Cheers, ML
Wow, this menu is fantastic, love it!
incredible
confess that you are not of this planet !!!
rsrrs
One things that i know from this.
You are CRAZY !
i really love this !
this is just amazing!!!
really easy to make
really beautiful
really useful
thanks!!!!
This is incredible. Fantastic work.
Awesome work dude, I <3 it! It's truly amazing and soo simple 😀
I love the look of this! Thanks for sharing.
Awesome!! Is sooo cool..
Thx 4 files
Very Nice Idea!!!
Ow! For sure I tweet this. Flash-like effect.
The most amazing navigation I’ve ever seen. Great tutorial!
Also looks great in Safari 5
Wow! It’s amazing, what you can do with this new methods and a little effort. Nice work.
This is really amazing.
buen articulo
more fancy menu tutorials
http://wectar.com/relaticious?yups=http://tympanus.net/Tutorials/BubbleNavigation/
Wow .. native functions with some css touches i really like .
Amazing, I really love this!
One little thing, though: let’s assume that there are real links instead of the “#” links .. so if you then click on a link and a new page gets shown and then hit the “back” button of the browser to return to this slide down box menu, then the clicked menu item is still expanded which is a little irritating because with this behaviour it’s possible to expand all the menu items at the same time. But apart from that: perfect!
ABSOLUTELY AMAZING! my jaw just dropped to the floor. Thank you for this!!
Thank you! I used the script here for my graphic design fanlisting!
http://fan.aelysia.net/design
Absolutely awesome!
Its good. Thanks!
Nice and cool… great work..
Hello:
Your menu is really great and I am planning to use it on a website I currently work on.
However since yesterday’s latest Apple’s security Software update it does not work anymore on safari 5.0.1 browser for Mac.
Safari 5.0.1 PC does not seem to be affected so doesn’t look like a browser issue.
Any clue where to look for a fix?
I updated (Apple’s security Software) and it works fine.
best design/tutorial blog around…incredibly tasteful and thorough. Thank you for all of your hard work and great ideas. Much appreciated!
The menu is quite good.
But I have a question, how to centre the whole mean in the html.
Can you have multiple menus as in a tree/sub menus. Main link opens sub menu, in the sub menu a link will oepn another panel of just links?
Thanks
Absolutely love what you guys do here. Really lovely tutorials and ideas.
I’m attempting to use this menu and Lightbox 2 at the same time, but Lightbox isn’t working.
It’s returning an error:
element.dispatchEvent is not a function
Any advice?
is there any fix for IE6? The border shown under the menu
Any ideas on how to get this to work with lightbox 2?
Hi!
Thanks for this tutorial! I’ll be using it on a Joomla powered website. So I’ve made a module for Joomla from the source code published here.
The question is … may I distribute the module under a gpl license to other Joomla users out there?
@Miha, of course! Glad you find it useful, cheers, ML
Beautiful effect! Thanks very much for the tutorial.
Is it possible to hide the description and only show it under the title when the .sdt_active box drops down on rollover?