Beautiful Slide Out Navigation: A CSS and jQuery Tutorial
Tutorials November 30, 2009 by Mary Lou 90 Comments

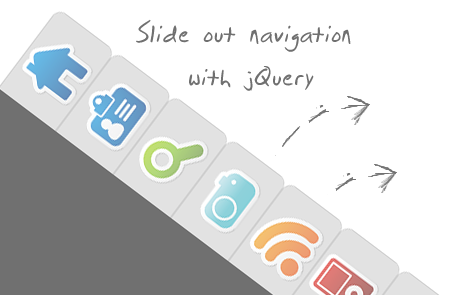
Today I want to show you how to create an amazing slide out menu or navigation for your website. The navigation will be almost hidden – the items only slide out when the user hovers over the area next to them. This gives a beautiful effect and using this technique can spare you some space on your website. The items will be semi-transparent which means that content under them will not be completely hidden.
The icons that we will be using are from the Colorful Sticker Icon Sets 1, 2, 3 and 4 by DryIcons. (It is not allowed to redistribute them under the free license, so I cannot include them in ZIP file of this tutorial.)
Ok, let’s get to work.
1. The HTML Structure
The only thing we will need for the navigation is a simple unordered list with links inside of the list elements:
<ul id="navigation"> <li class="home"><a title="Home"></a></li> <li class="about"><a title="About"></a></li> <li class="search"><a title="Search"></a></li> <li class="photos"><a title="Photos"></a></li> <li class="rssfeed"><a title="Rss Feed"></a></li> <li class="podcasts"><a title="Podcasts"></a></li> <li class="contact"><a title="Contact"></a></li> </ul>
The list is getting an ID because we want to refer to it later in the JavaScript. With jQuery, we will make the link items slide out whenever we hover over the li elements of the list.
2. The CSS
First, we define the CSS properties for the list:
ul#navigation {
position: fixed;
margin: 0px;
padding: 0px;
top: 10px;
left: 0px;
list-style: none;
z-index:9999;
}
The navigation should always be accessible for the user, even if he scrolls down the page. So, the position should be fixed. Margin and padding are explicitly set to 0, since the unordered list has default values for them. The navigation should also be on top of all other elements on the page. That’s why we set the z-index very high.
Now, let’s look at the list element properties:
ul#navigation li {
width: 100px;
}
For the links in the list elements, we define the following CSS properties:
ul#navigation li a {
display: block;
margin-left: -85px;
width: 100px;
height: 70px;
background-color:#CFCFCF;
background-repeat:no-repeat;
background-position:center center;
border:1px solid #AFAFAF;
}
The margin-left is set to a negative value because we want to hide most of the icon and only reveal it when we hover over the list items. Basically, we are pushing the link element to the left, outside of the visual area of the page:

In the JavaScript part we will define a function that makes the elements slide out. But let’s first add some rounded borders to them (they don’t work in Internet Explorer, though):
ul#navigation li a {
display: block;
margin-left: -85px;
width: 100px;
height: 70px;
background-color:#CFCFCF;
background-repeat:no-repeat;
background-position:center center;
border:1px solid #AFAFAF;
-moz-border-radius:0px 10px 10px 0px;
-webkit-border-bottom-right-radius: 10px;
-webkit-border-top-right-radius: 10px;
-khtml-border-bottom-right-radius: 10px;
-khtml-border-top-right-radius: 10px;
}
To make them really neat, we add some opacity, so that the content underneath is visible:
ul#navigation li a {
display: block;
margin-left: -85px;
width: 100px;
height: 70px;
background-color:#CFCFCF;
background-repeat:no-repeat;
background-position:center center;
border:1px solid #AFAFAF;
-moz-border-radius:0px 10px 10px 0px;
-webkit-border-bottom-right-radius: 10px;
-webkit-border-top-right-radius: 10px;
-khtml-border-bottom-right-radius: 10px;
-khtml-border-top-right-radius: 10px;
opacity: 0.6;
filter:progid:DXImageTransform.Microsoft.Alpha(opacity=60);
}
The last filter property will make this work for Internet Explorer as well.
These were the common properties of all the link elements in the list. Now we will define the background image for the links in the specific list items:
ul#navigation .home a{
background-image: url(../images/home.png);
}
ul#navigation .about a {
background-image: url(../images/id_card.png);
}
ul#navigation .search a {
background-image: url(../images/search.png);
}
ul#navigation .podcasts a {
background-image: url(../images/ipod.png);
}
ul#navigation .rssfeed a {
background-image: url(../images/rss.png);
}
ul#navigation .photos a {
background-image: url(../images/camera.png);
}
ul#navigation .contact a {
background-image: url(../images/mail.png);
}
And that was the CSS part. Now, let’s take a look at the few lines of JavaScript that will give some life to the navigation.
The JavaScript
Using jQuery, we will make the icons appear whenever we hover over one of the list items. Remember, the list item itself is 100 pixel wide, only the link element is being pushed outside of the page to the left, so that it is not visible.
We define the following function (before the end of the body tag) that get’s executed whenever we hover over a li:
$(function() {
$('#navigation > li').hover(
function () {
$('a',$(this)).stop().animate({'marginLeft':'-2px'},200);
},
function () {
$('a',$(this)).stop().animate({'marginLeft':'-85px'},200);
}
);
});
So, when hovering, we want the specific link element to get a left margin of -2 pixels, and that nicely animated, and not too slow (200 milliseconds). Moving the mouse out shall put the link element back to it’s old position (-85 pixels). The stop() function “stops all the currently running animations on all the specified elements” which gives the beautiful effect when, for example, hovering over all elements very quickly.
What would be really nice now, is to make the user aware that there is such an amazing navigation on your web page. Like it is now, the user will merely see some grey borders sticking out from the left side of the page. What could be better for showing the menu than actually showing the navigation shortly when the page loads. So, here we go.
So, we will initially let the navigation be visible. For that we change the left margin of the link elements:
ul#navigation li a {
display: block;
margin-left: -2px;
width: 100px;
height: 70px;
background-color:#CFCFCF;
background-repeat:no-repeat;
background-position:center center;
border:1px solid #AFAFAF;
-moz-border-radius:0px 10px 10px 0px;
-webkit-border-bottom-right-radius: 10px;
-webkit-border-top-right-radius: 10px;
-khtml-border-bottom-right-radius: 10px;
-khtml-border-top-right-radius: 10px;
opacity: 0.6;
filter:progid:DXImageTransform.Microsoft.Alpha(opacity=60);
}
And we add the following line at the beginning of the JavaScript function:
$(function() {
$('#navigation a').stop().animate({'marginLeft':'-85px'},1000);
$('#navigation > li').hover(
function () {
$('a',$(this)).stop().animate({'marginLeft':'-2px'},200);
},
function () {
$('a',$(this)).stop().animate({'marginLeft':'-85px'},200);
}
);
});
With that line we defined that it should take 1 second to give a left margin of -85 pixels to all the link elements in the list. Through the margin that we set we will show the navigation to the user and with the JavaScript we will then hide it.
And that’s it!
If you are a shadow-freak (like me), you can also add these lines to the CSS of the link element:
ul#navigation li a {
display: block;
margin-left: -2px;
width: 100px;
height: 70px;
background-color:#CFCFCF;
background-repeat:no-repeat;
background-position:center center;
border:1px solid #AFAFAF;
-moz-border-radius:0px 10px 10px 0px;
-webkit-border-bottom-right-radius: 10px;
-webkit-border-top-right-radius: 10px;
-khtml-border-bottom-right-radius: 10px;
-khtml-border-top-right-radius: 10px;
-moz-box-shadow: 0px 4px 3px #000;
-webkit-box-shadow: 0px 4px 3px #000;
}
Adding the box shadow and removing opacity, will give the navigation items a 3D look. Leaving the opacity makes them look cool, too, try it out and enjoy!
Note: Check out an alternative version of this tutorial here
Discussion90 Join the discussion
Trackbacks
- Beautiful Slide Out Navigation: A CSS and jQuery Tutorial | Codrops | Kerja Keras Adalah Energi Kita
- uberVU - social comments
- 15 Handpicked Fresh and Useful jQuery Tutorials
- You are now listed on FAQPAL
- 15 hand picked Jquery Tutorials :: Reflex Stock Photo Blog
- Inspired: Javascript & jQuery Love
- Beautiful Slide Out Navigation Revised | Codrops
- Beautiful Slide Out Navigation: A CSS and jQuery Tutorial | Codrops « Netcrema – creme de la social news via digg + delicious + stumpleupon + reddit
- Beautiful Slide Out Navigation: A CSS and jQuery Tutorial | Codrops » Web Design
- links for 2009-12-09 | AndySowards.com :: Professional Web Design, Development, Programming Freelancer, Hacks, Downloads, Math and being a Web 2.0 Hipster?
- Beautiful Slide Out Navigation: A CSS and jQuery Tutorial | Codrops : Popular Links : eConsultant
- 15 Handpicked Fresh and Useful jQuery Tutorials » Chilesabe
- - leg med nye medier. Eller noget.
- ?????????jQuery ????????? | Nutspress
- Beautiful Slide Out Navigation: A CSS and jQuery Tutorial | Design Newz
- Mes favoris du 10-12-09 au 14-12-09 » Gilles Toubiana
- kopfkribbeln webdesign-blog » Slide Out Navigation mit CSS und jQuery
- Sket på nettet den 17.12.09
- Menú lateral de pestañas desplegables con CSS y jQuery - elWebmaster.com
- WordPress Plugins - Ariotek Forums
- 6 Unique & Creative Navigation Menus with Free Source | Webmaster Index
- eagrapho » 35 Awesome jQuery Navigation Enhancing Plugin Tutorials
- 45 jQuery Navigation Plugins and Tutorials - Noupe
- 45 jQuery Navigation Plugins and Tutorials | Google Reader | ????? ?????
- 45 jQuery Navigation Plugins and Tutorials
- Wordpress Blog Services - 45 jQuery Navigation Plugins and Tutorials
- Online Marketing Connect — Blog — 45 jQuery Navigation Plugins and Tutorials
- 45 jQuery Navigation Plugins and Tutorials | iDESIGN
- 45 jQuery Navigation Plugins and Tutorials » IMvsMI blog
- 45 jQuery Navigation Plugins and Tutorials - Interactive Middle East
- Navigation Frustration « My Blog


It really is beautiful. :)
This slide out menu is great!
Thanks and keep up the good work!
Thanks, we are working on more tutorials like this! Danke! :-)
Hvala! BTW great blog!
that’s slick!
very nice indeed.
Exstremely lovely site. Very impressed about all the lesson there are to learn and to know how much help is there also. Keep up the great work
This IS a beautiful slide navigation. I might use it on my site at http://nickburd.com
maybe it will be a good way to show portfolio items? possibly not.
Hi,
if the portfolio items are not too big, it might be an original way to apply this. Let me know if you need any help.
Greets
I really like the technique, but if anyone applies it to get a similar result to what’s in the demo, that’s going to be pretty bad for usability.
I mean it’s the kind of menu where you have to hover all the options to find the one you’re looking for.
“Well ain’t that cute… But it’s wrong!!” — guy from Two Stupid Dogs http://www.youtube.com/watch?v=iLwAjOGQcHo
Maybe if in the “hidden” state part of each icon was visible — that would help.
Also, another option to go with would be to have some brief horizontal text on each item visible at all times.
Hi Mary
First of all I want to say thanks a million for this tutorial as I have been looking for a way to create this effect without using Flash and this tutorial exaplins it in a really simple way. I’m totally new to jquery so I need it to be pretty simple!
I’m in the process of going through the demo to work out how you did this. Can I ask – the jquery sheet in the download has over 4000 lines of code – do you need all of these lines? I really only want to make a simple bar with about four of five moving tabs.
Thanks
Hi James,
the sliding effect of this navigation does not only come from the little script included in the end of the file, but is based on the library of jQuery which you have to include in order to make those functions work. All works and plugins of jQuery need that library file. It is indeed very big, but it is necessary. There is a minified version though, which you can include the same way like I did in the file, or you can include it by referring to the one hosted by Google. Just replace the existing script inclusion with this one:
<script src="http://ajax.googleapis.com/ajax/libs/jquery/1.3.2/jquery.min.js" type="text/javascript"></script>I hope it helped and thanks for your feedback!
Mary Lou
Great post. Glad to see my navigation ideas making their way through the community :)
I will definetly use this!! Very nice effect !
Thanks a lot
Three words: Mystery Meat Navigation. It’s a neat trick that could be fixed to be cool, but the way it’s implemented here is a usability *nightmare*.
This is nice. The only addition I would make deals with usability. You don’t know what the button is all about unless you hover over it. It could be a real pain for someone who doesn’t memorize the order of the buttons.
I would simply use text or a smaller icon to indicate prior to hovering.
Other than that, this is a really nice-looking menu item
Hi to all, thanks for your feedback. To deal with those usability issues, I did already a new tutorial that can be found here
Cheers, Mary Lou
Great tutorial, thx for share :-)
I’ve been using a similar approach in my personal website http://www.futekov.com/alexander but without any javascript (thus it doesn’t work in all browsers).
I may soon write a tutorial about it and publish it somewhere.
Doesn’t work well in chrome :(
Works perfectly in Version 4.0.249. Which version do you have?
This is great – but does anybody know a way to keep the tab sticking out if say you’re on the “about” page?
oh… Man!!
That’s too Cool!!
You are so great man!!
thank you for the great tutorials.
Hi Mary Lou,
Your tutorial was very helpful and this navigation code really worked for me.
The only thing I wanted to know is how to change the rollover effect so that the boxes that I hover on slides to the left instead of the right. I got the CSS to align the boxes at the right side already.
I’m pretty sure it has to do something with the jQuery code itself. But I could be wrong. Please reply back. Thanks in advance. :)
Actually, I’ve figured it out now. It wasn’t the jQuery file. Please disregard my previous post.
Hello Jing!
I am glad you found the solution, sorry I was not in time to help you! Greets, ML
You have got to love JQUERY. Make a website that much more alive.
Good read!
Great looking plugin. Thanks for creating this. Is there any way to have the menu items open by default? In other words, have them in the hover state. Also, how would you center the menu vertically?
Hi Alex,
if you want the menu items to stick out already, change the intial animation in the javascript function to ‘marginLeft’:'-10px’. In the hover function, change the values to ‘marginLeft’:'-2px’ (when hovering) and to ‘marginLeft’:'-10px’ (when mouse out). In the CSS you can change the margin-left to -85px in the “ul#navigation li a”. To center the whole thing you need the height of the menu which is the height of each item plus border times the number of item: 72*7 is 504. Then set the top of the ul#navigation to 50% and set margin: -252px 0px 0px 0px. The margin top needs to be the negative value of half of the height of the menu. And that’s it! Hope it helps!
Cheers, ML
Thank you, Mary Lou. This is a wonderful menu system, and the animation is very cool. Also, the great support you provide for questions makes it event better :)
fantastic work pal.. and your post is so informative thus will help anyone, if s/he want to…
Hi Mary Lou
Is there any way to have the tabs aligned to the bottom of the page with them sliding upwards? Any advice you have would be great.
Hello Mike,
it’s better to use the revised navigation, since it is easier to modify for your purpose: http://tympanus.net/codrops/2009/12/08/beautiful-slide-out-navigation-revised/
I have made a new version that slides from the bottom. You can download it here: http://tympanus.net/Tutorials/FixedNavigationTutorial2/FixedNavigationTutorial2_bottom.zip
I hope it helps! Cheers, ML
I’m not super experienced with all of this. I was just wondering what goes into the header and what goes into the stylesheet. And what needs to be changed. I would really love to use this. Thank you! Email me at admin(at)ftskonline.com if you need (:
Hello, congratulations on your website, sorry I wanted to know how to do that instead of the menu to be lateral is in the top, please I’ve tried it and can not.
Excuse me, Please disregard my previous post. I saw the link that you gave to Mike, very good tutorial, congratulations,
Fantastic tutorial mate.
I’ve been looking for something like this.
Nicely done
Hi, Mary Lou. Found out that the rounded corners only work on Opera if you apply this code to the “ul#navigation li a” style rule:
border-bottom-right-radius: 10px;
border-top-right-radius: 10px;
This is described here: http://dev.opera.com/articles/view/css3-border-background-boxshadow/#border-radius
Just add those two lines and Opera (tested on 10.51) will display the rounded corners too :)
@AlexC Thanks a lot! Cheers, ML
Great tutorial. Thanks!
very nice!
Hello, thanks for your tutorial. I have one question, there are any way to fix one of the tabs with any animation?
Thanks.
Great use of jQuery, I appreciate how simple and to the point this script it. It was very easy to modify to suit my needs.
Bookmarking this site and sharing it with others. :) Thanks so much!
Very, very cool. Doesn’t work on the iPad. Damn that hover! :) Any way to do a first click open, second click choose?
Hello its nice really but if i want same Effect with right Side means i want Right navigation with my Site , can anyone suggest me what need because i have try to customize it but not success waiting for reply thanks in advance.
Nice work ! Thanks for sharing it .
Mary Lou, I’m always staggered by how creative some people are, this is really beautiful, yet so simple and elegant. I would love to use this and wondered how/what would have to be changed to have this appear on the right-hand side, if this can be done? Thank you. ~ Raubie
nice designs
I read this tutorial and applied in my blog. Thanks for the posing.
Great jQuery Resource here. Thanks
Hello its nice really but if i want same Effect with right Side means i want Right navigation with my Site , can anyone suggest me what need because i have try to customize it but not success waiting for reply thanks in advance.
I love this navigation. thanks
how could one implement images [instead of coloured blocks] — eg: paper slips
Cheers for the post man, is it that you is a pro. I think you might be. Many thanks, Zoe
gr8 job That bit was pretty impressive, thanks for posting.
I am trying to figure out how to do this without the li being a link. But after hrs of trying, I can’t seem to figure it out :-(
Can somebody help me please?
fantastic works.
I love it.
It is excellent. Thank you for sharing.