The mask-border property is used to apply a border mask image to an element.
It is a shorthand property used to set the longhand properties mask-border-source, mask-border-mode, mask-border-slice, mask-border-width, mask-border-outset, and mask-border-repeat.
For a detailed description of what each property does, please refer to the property’s entry.
When a mask border image is to be set on an element, it is set in several steps.
First, the image specified in the mask-border-source property is sliced into nine images—four corner images, four edge images, and one middle image—using the mask-border-slice property.
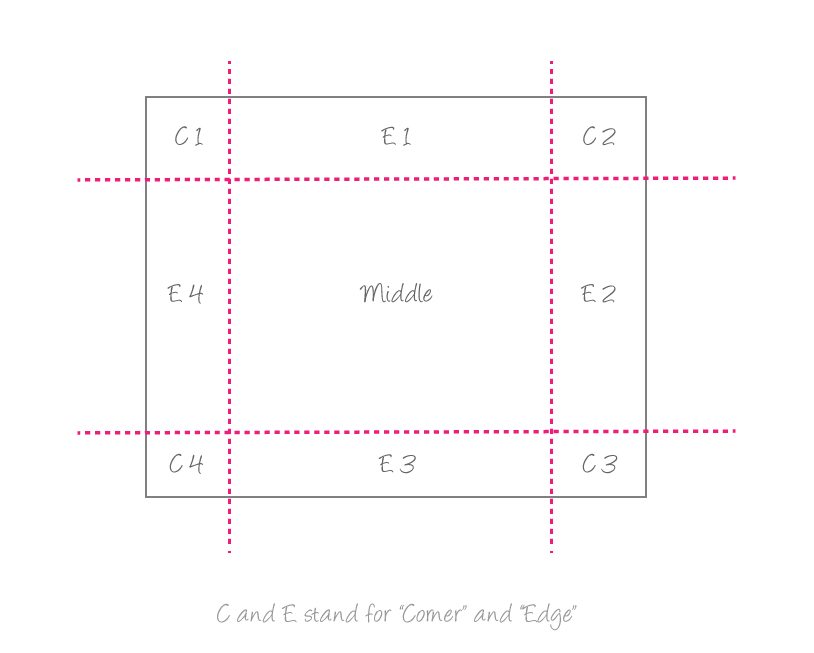
mask-border-slice property. They don’t have to be equal in size.The resulting nine images are then scaled, positioned, and tiled into their corresponding mask border image regions in the following steps:
- The images are scaled according to the value specified using the
mask-border-widthproperty.The top and bottom edge images are scaled vertically to fit the corresponding specified width offsets.
The right and bottom left are scaled vertically to fit the corresponding specified right and left width offsets.
The corner images are scaled to fit the width specified on the edges that they are a part of.
And the middle image’s width is scaled by the same factor as the top image unless that factor is zero or infinity, in which case the scaling factor of the bottom is substituted, and failing that, the width is not scaled. The height of the middle image is scaled by the same factor as the left image unless that factor is zero or infinity, in which case the scaling factor of the right image is substituted, and failing that, the height is not scaled.
- The images are scaled according to the value specified using the
mask-border-repeatproperty.If the first keyword of the
mask-border-repeatproperty isstretch, the top and bottom edge images and the middle image are stretched to fit the width of the border image area. Their height is not scaled.If the first keyword is
round, the top, middle and bottom images are resized in width, so that exactly a whole number of them fit in the middle part of the mask-border-image area.If the first keyword is
repeatorspace, the top, middle, and bottom images are not scaled anymore, so their height would only be scaled from the first step above.If the second keyword is
stretch,round,repeat, orspace, the same scaling is applied to the respective left, middle, and right images, affecting the height of the images; their width is not scaled except from the first step. -
Now that the images are scaled, they are positioned. Positioning the images is also related to the
mask-border-repeatproperty.If the first keyword is
repeat, the top, middle, and bottom images are centered horizontally in their respective areas. Otherwise the images are placed at the left edge of their respective parts of the mask-border-image area.If the second keyword is
repeat, the left, middle, and right images are centered vertically in their respective areas. Otherwise the images are placed at the top edge of their respective parts of the mask-border-image area. -
After the images have been scaled and positioned, they are tiled (repeated) as many times as necessary depending on the value of the
mask-border-repeatproperty, to fill their respective areas.If the value is
repeat, the images are repeated as much as necessary to fill their respective areas. If the value isspace, any partial tiles are discarded and the extra space is distributed before, after, and between the tiles. (I.e. the gap before the first tile, the gap after the last tile, and the gaps between tiles are equalized.)
The mask border image can be extended outside the border area of the element using the mask-border-outset property. Refer to the property’s entry for details.
The result of the above steps can be best understood when seen visually. So it is best if you use an interactive tool to see how the different values change the rendering of the mask border image. Since the steps and procedure for applying a mask border image to an element is the same as applying a border image to it, it might help if you have a look at demos and/or interactive tools explaining the latter; that will help provide you with more insight and better understanding of how this works. The following are two great tools to do just that:
- Border Image Generator—Interactive Demo and Tool by Kevin Decker
- Grokking CSS3 border-image—Interactive Demo by Nora Brown
Trivia & Notes
The mask shorthand resets the properties mask-border, mask-border-source, mask-border-mode, mask-border-slice, mask-border-width, mask-border-outset and mask-border-repeat.
Official Syntax
-
Syntax:
mask-border: <'mask-border-source'> || <'mask-border-slice'> [ / <'mask-border-width'>? [ / <'mask-border-outset'> ]? ]? || <'mask-border-repeat'> || <'mask-border-mode'> - Initial: The concatenation of the initial values of each of the longhand properties
- Applies To: All elements. In SVG, it applies to container elements excluding the <defs> element and all graphics elements
- Animatable: no
Notes
Omitted values from the shorthand declaration are set to their default values.
Note that the slash character ‘/’ needs to be placed exactly where it says in the official syntax, otherwise the declaration would be invalid and won’t work. The mask-border-slice property and the mask-border-width property need to be separated by a slash, and so does the latter and the mask-border-outset property. If all three are specified, two slashes are needed.
Values
- <‘mask-border-source’>
-
See the
mask-border-sourceproperty entry for a list of possible values. - <‘mask-border-slice’>
-
See the
mask-border-sliceproperty entry for a list of possible values. - <‘mask-border-width’>
-
See the
mask-border-widthproperty entry for a list of possible values. - <‘mask-border-outset’>
-
See the
mask-border-outsetproperty entry for a list of possible values. - <‘mask-border-repeat’>
-
See the
mask-border-repeatproperty entry for a list of possible values. - <‘mask-border-mode’>
-
See the
mask-border-modeproperty entry for a list of possible values.
Examples
The following sets a border image on an element.
.element {
  mask-border: url(path/to/mask-image.png) 25 40 25 40 / 30 40 30 40 / 30 space;
}
Live Demo
The mask image used in the following demo is the following one:

Play with the values of the mask-border property to see how the application of the mask on the element changes.
Note that the demo currently (June, 2014) does not work in any browser. It may be useful to check out the demo from the border-image entry. The way the border mask image is applied is similar to the way a border image is applied, except that the mask image is used to mask parts of the element. The process of setting the images is the same, so checking that entry may be useful for more insight and to better know what to expect from this property.
Browser Support
CSS Masks
Method of displaying part of an element, using a selected image as a mask
W3C Candidate Recommendation
Supported from the following versions:
Desktop
- 120
- 53
- No
- 106
- 15
Mobile / Tablet
- 15
- 123
- No
- 123
- 124
Notes
This module, as you can see in the support table above, hasn’t been fully implemented in all browsers, so you’re probably not going to be able to use all features even in browsers that have implemented certain properties (for the time being).
In the meantime, you can check out this open source feature support table by Alan Greenblatt on GitHub. The purpose of this table is to provide some insight into what the current state of affairs is with various browser implementations of CSS Clipping and Masking features.