From our sponsor: Leverage AI for dynamic, custom website builds with ease.
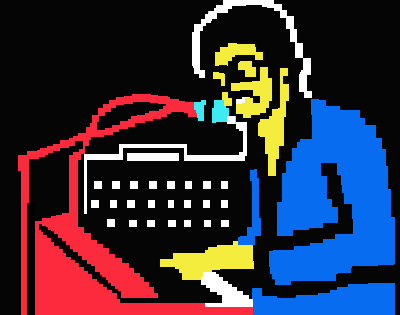
The mighty stylophone. One of the greatest musical instruments ever created. Used by the likes of David Bowie, Kraftwerk and pretty much no-one else inbetween, I’ll show you how to make this fantastic invention using the Web Audio API.
Please note: this is highly experimental and only works as intended in browsers that support the Web Audio API.
The Web Audio API
The Web Audio API is a relatively new invention. It’s a high-level way of processing and manipulating sound in a web browser.
Because it’s so new, it’s currently only supported by Chrome and Safari, but Mozilla are working hard on making sure it works in Firefox. As such, this tutorial will only work on said browsers.
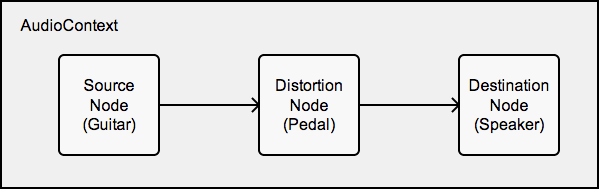
We use JavaScript to interact with the API using what is known as a Node Graph. This allows us to control the flow and relationship of different audio components. Imagine strumming an electric guitar. The audio signal would travel down a cable then into an amplifier. If you wanted to change the sound of the guitar, you might take the end of the cable and plug it into an effects unit, like a distortion pedal. You would then connect another cable from the effects unit to the amplifier. When activated, the distortion pedal would alter the sound and pass it on to the amplifier. This idea of chaining things together is the core concept of the Web Audio API.
The Stylophone

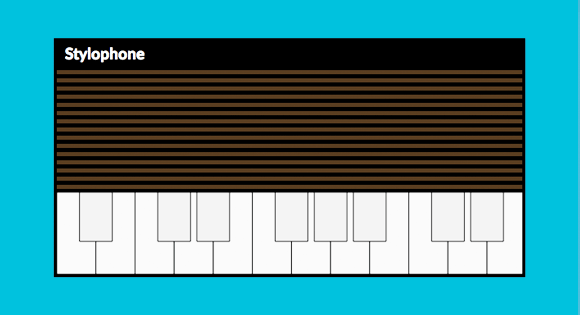
A very clever man called Brian Jarvis invented the Stylophone in 1967. It consists of a little metal keyboard which is played, as its name suggests, using a stylus. If you’re not familiar with it, have a look at some of the various videos online to get an idea of what we’re making. It’s monophonic, meaning that it can only play one note at a time. This makes it a perfect choice for a first web audio project.
Make Some Noise
The Web Audio API uses a “context” similar to the way the <canvas> tag does. In fact you can think of your context as the world in which your musical creation is going to exist. Well, the audio part of it at least. It’s easy to create. You can follow along by opening up your browser’s JavaScript console.
var context = new webkitAudioContext(); // webkit prefixed for now.
Simple.
Waves
We’re not going to delve into the ins and outs of how sound works, but it’s important to know that sound travels in waves. You’ve probably seen visual representations of these waves if you’ve ever recorded audio onto your computer, or played a song using SoundCloud. Essentially, different sounding waves look different. The most basic of waves, the sine wave, has a nice round sound. A square wave, however, has a much harsher sound. An oscillator generating a square wave at different frequencies is how a stylophone produces different notes. Traditionally, an oscillator is a piece of electronic circuitry that produces a repetitive oscillating frequency; in our case, the square wave. Luckily, the wonderful Web Audio API has us covered. It has its very own built-in method for creating sound waves.
var oscillator = context.createOscillator();
Great! We now have a working oscillator. Although, by default it produces a sine wave. Let’s change that.
oscillator.type = oscillator.SQUARE; // Change oscillator to produce a square wave.
There are other values you can change the oscillator to, such as ‘SAWTOOTH’ and ‘TRIANGLE’. You may want to customize your stylophone by using a different type of wave.
Making a connection
Using our guitar analogy from earlier, if you were to play an electric guitar without it being connected to an amplifier you wouldn’t hear anything. The exact same thing would happen here. If we were to start our oscillator, we wouldn’t hear anything as we haven’t connected it to our speakers. With the Web Audio API, our speakers are represented by “context.destination”. To connect our oscillator to the speakers we do the following:
oscillator.connect(context.destination); // Connect our oscillator to the speakers.
Super. We’ve got a square wave oscillator ready to go! Ready? Let’s start it off.
oscillator.noteOn(0); // Start the oscillator playing after 0 seconds.
Beautiful. Similarly, the oscillator can be stopped by doing
oscillator.noteOff(0); // Stop the oscillator after 0 seconds.
You should be aware that these methods have been recently renamed to start() and stop() in the Web Audio API spec, but Safari hasn’t implemented these changes yet, so we’ll keep using noteOn/Off in the meantime.
If you find these oscillators a bit loud, don’t worry, you can control the volume of pretty much anything you want with the Web Audio API. All we have to do is add a Gain Node to our chain.
var gainNode = context.createGainNode();

gainNode.value = 0.25;

oscillator.connect(gainNode); // Connect our oscillator to the Gain Node.
gainNode.connect(context.destination); // Connect the Gain Node to the speakers.
As you can see, we’ve taken a lead from our oscillator, connected it to a Gain Node then taken another lead to the speakers (context.destination).A Gain Node multiplies the volume coming into it and sends that result on to the next node in the chain. So in our case, we’re multiplying it by 0.25, making the volume a quarter of the amplitude it was when it entered the node.
Different Notes for Different Folks
In order for the user to interact with these oscillators, we’re going to need a keyboard. Luckily, I’ve written a little script called Qwerty Hancock, which makes it easy to create an interactive vector keyboard in the browser. It relies on the vector drawing library Raphaël, so after you’ve downloaded them both, include them like so:
<script src="js/raphael-min.js"></script>
<script src="js/qwerty-hancock.js"></script>
We’ll need an empty element in our html for the keyboard to go, so let’s make one, and give it an id of “keyboard”.
<div id="keyboard"><div>
Next, we instantiate the keyboard.
// Create keyboard using Qwerty Hancock.
var keyboard = qwertyHancock(
{
     id: 'keyboard',
     height: 100,
     width: 568,
     startNote: 'A2',
     octaves: 1.7,
     whiteKeyColour: '#eee',
     blackKeyColour: '#ddd',
     blackKeyWidth: 40,
     blackKeyHeight: 60,
     hoverColour: 'silver',
     keyboardLayout: 'en'
}
);
These parameters are fairly self-explanatory, but further documentation is available on the Qwerty Hancock site.
Qwerty Hancock also gives us access to two callback functions. The first one is called when the user presses a key on the keyboard, the second when she takes her finger off a key.
Let’s put these callbacks with what we’ve got so far so we can see what it all looks like.
<!doctype html>
<html>
	<body>
		<div id="keyboard"><div>

		<script src="js/raphael-min.js"></script>
		<script src="js/qwerty-hancock.js"></script>

		<script>
            // our script (see below)
        </script>
    </body>
<html>
// Create Web Audio Context.
var context = new webkitAudioContext();

// Create keyboard using Qwerty Hancock.
var keyboard = qwertyHancock(
    {
        id: 'keyboard',
        height: 100,
        width: 568,
        startNote: 'A2',
        octaves: 1.7,
        whiteKeyColour: '#eee',
        blackKeyColour: '#ddd',
        blackKeyWidth: 40,
        blackKeyHeight: 60,
        hoverColour: 'silver',
        keyboardLayout: 'en'
    }
);

keyboard.keyDown(function (note, frequency) {
    // Key on keyboard has been pressed.
});

keyboard.keyUp(function (note, frequency) {
    // Key on keyboard has been depressed.
});
Creating oscillators using the Web Audio API is cheap, that is to say they don’t take up a lot of memory or processing power to instantiate them. Also, after you call the noteOff() method, they are no longer usable. You can’t just call noteOn() again. This means that we should create an oscillator each time a key is pressed, and then destroy it once the user lets go of it. The best thing to do is stick our code for creating the oscillator into a convenient function, while keeping a reference to it so we can refer to it when we need to stop it later.
var currentOscillator;

var playNote = function () {
var oscillator = context.createOscillator(),
gainNode = context.createGainNode();

oscillator.type = oscillator.SQUARE;

// Set volume of the oscillator.
gainNode.gain.value = 0.3;

// Route oscillator through gain node to speakers.
oscillator.connect(gainNode);
gainNode.connect(context.destination);

oscillator.noteOn(0);

currentOscillator = oscillator;
};

var stopNote = function () {
currentOscillator.noteOff(0); // Stop oscillator after 0 seconds.
currentOscillator.disconnect();
}
The best thing to do after you stop an oscillator is to disconnect it. This way it will get picked up by the browser’s garbage collector.
Let’s call these functions when a key on the keyboard is pressed and depressed respectively.
keyboard.keyDown(function (note, frequency) {
playNote();
});

keyboard.keyUp(function (note, frequency) {
stopNote();
});
OK, refresh your browser and you should now have a working stylophone! Ah. Not quite. All the notes have the same pitch. We need to change the frequency of the oscillator depending on what note is pressed. As you may have noticed, Qwerty Hancock passes back the note and frequency of the key on the keyboard that was pressed. This makes things a lot easier. We can use this to set the frequency of the oscillator. We’ll need to pass the frequency to the playNote function first, then use that value to set the frequency of the oscillator.
var playNote = function (frequency) {
var oscillator = context.createOscillator(),
gainNode = context.createGainNode();

oscillator.type = oscillator.SQUARE;
oscillator.frequency.value = frequency;

// Set volume of the oscillator.
gainNode.gain.value = 0.3;

// Route oscillator through gain node to speakers.
oscillator.connect(gainNode);
gainNode.connect(context.destination);

oscillator.noteOn(0);

currentOscillator = oscillator;
};

var stopNote = function () {
currentOscillator.noteOff(0); // Stop oscillator after 0 seconds.
currentOscillator.disconnect();
}

keyboard.keyDown(function (note, frequency) {
playNote(frequency);
});

keyboard.keyUp(function (note, frequency) {
stopNote();
});
You should now (hopefully) have a working stylophone! Let’s make it look a bit nicer before we show it off.
.stylophone {
    margin: auto;
    width: 576px;
    border: 4px solid black;
}

.stylophone h1 {
    background-color: black;
    color: white;
    font-size: 1.2em;
    line-height: 1.4em;
    margin: 0;
    padding: 2px 10px 2px;
}

.stylophone .speaker {
    height: 154px;
    background: -webkit-linear-gradient(black 50%, #462e16 50%);
    background-size: 10px 10px;
    border-bottom: 4px solid black;
}
Beautiful! Hope you’ve enjoyed this tutorial and are ready to conquer the world with your new skills. If you’re interested, check out some of the more complicated things I’ve made with the Web Audio API.


Gorgeous !
Funny:)
Amazing.
But not including the href attribute fails to show the proper cursor, which in this case more than in others should have been a finger (pointer). IMHO.
😀
Wow! Nice experiment!
all of this tutorials are free for use in any site???
5+ !!!!!!!!!!
this is great!
Why not have the playNote function create an oscillator tuned to a given frequency and set to a given wave type and then reuse the same gain and destination nodes (in other words reconnect to the same gain and destination nodes)? Why not only create what is absolutely necessary per note? Can an oscillator not be created and connected to a same/reusable effect chain? It makes a great deal of sense to modularize the create oscillator function from the rest of the processing chain and its nodes. All I’ve seen are these simple demos for Web Audio thus far, leaving me wondering if Web Audio can be used for something more professional?
Another thing missing from Web Audio is some JSON configuration. It should be possible to have a JSON format that can be used to describe a audio graph of any complexity. Such a JSON file could then be deserialized/digested into a audio graph on demand and also serialized back to a JSON file. For example, they have done a nice JSON format for D3.js visualizations (see Vega Editor here: http://trifacta.github.io/vega), why not have something savvy like Vega for Web Audio?
This is great, I have been annouying the guys in the office with my awesome playing skills.
“gainNode.value = 0.25;” is actually “gainNode.gain.value = 0.25” ….. i think…
If you hold a note, then hold another one, when you let go of the first one the second also stops. You need to track keyboard events per note. When playing a keyboard you usually end up touching the next note before the previous one (doesn’t apply to a stylophone, but then you shouldn’t have keyboard support 🙂
Very good. I loved it. I did not study the code but I was 10 minutes playing with the keyboard …
is it sad that i played the demo for over an hour 😛
This is absolutely amazing, thanks for sharing.
awesome !!
Is it just me, or does the keyboard not play?