From our sponsor: Leverage AI for dynamic, custom website builds with ease.
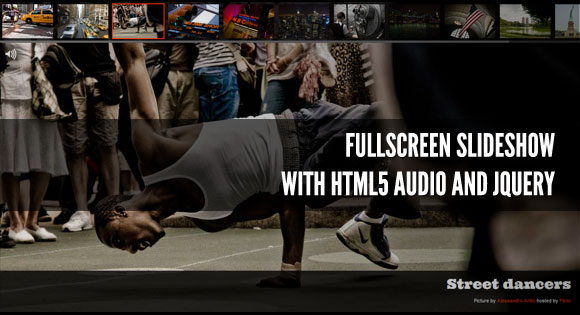
In today’s tutorial we’ll create a fullscreen photo slideshow to illustrate a New York picture series. We will add sounds with the HTML5 audio element in order to give life to the gallery and try to recreate the ambient of this vibrant city.
To create the slideshow and the fullscreen picture display, we’ll use the Vegas jQuery plugin that compiles many ideas previously shared in Codrops articles in one plugin. The audio elements will be controlled with Buzz, a JavaScript audio library. You can find out more about these two plugins that I wrote on my website: Jay Salvat’s website.
The thumbnails navigation will be spiced up with a custom scrollbar using jScrollPane by Kelvin Luck and some easing effects provided by the jQuery easing plugin by George McGinley Smith.
The New York photography is by Alessandro Artini, check out his photos on his Flickr photostream.
The Markup
Let’s set the stage! First we create a placeholder to contain the picture title and credits.
<div id="title">
    <h1>New York Gallery</h1>
    <p>Pictures by <a href="http://www.flickr.com/">Alessandro Artini</a></p>
</div>
Then the thumbnails are placed in an unordered list. Each thumbnail is linked to a big representation of the picture and carry the title of the picture. Note that we add a data attribute to some links to adjust the vertical alignment of the displayed fullscreen picture to avoid cropping an important part.
Two empty divs are added to hold the pointer and the flash effect when the slides change.
<div id="flash"></div>
<div id="thumbnails">
  <ul>
    <li>
      <a href="01.jpg">
        <img src="01b.jpg" title="New York moving" data-valign="top">
      </a>
    </li>
    <li>
      <a href="02.jpg">
        <img src="02b.jpg" title="New York traffic" data-valign="bottom">
      </a>
    </li>
    <li>
      <a href="03.jpg">
        <img src="03b.jpg" title="Street dancers">
      </a>
    </li>
    ...
    </ul>
    <div id="pointer"></div>
</div>
Finally, we place the links for the pause and volume management.
<div id="pause"><a href="#">Paused</a></div>

<div id="volume"><a href="#">Sounds</a></div>
The CSS
First, we’ll define the style of the title part which is placed at the bottom of the screen with a black background. We use the “rgba” notation which allow us to set the opacity of the color. Note that we prepend it by the standard hex notation #000 for older browsers.
The heading will be in the nice Ultra font from the Google fonts collection:
#title {
    background: #000;
    background: rgba(0, 0, 0, 0.8);
    bottom: 0px;
    font: 11px Arial, Helvetica, sans-serif;
    padding: 10px 20px;
    position: fixed;
    right: 0px;
    text-align: right;
    width: 100%;
}
    #title h1 {
        font: 30px 'Ultra', Arial, serif;
        margin: 0;
        padding: 0;
    }
We’ll follow the same technique for the thumbnails. The elements of the list are floated to display the pictures as an horizontal bar.
#thumbnails {
    background: #000;
    background: rgba(0, 0, 0, 0.8);
    height: 90px;
    left: 0;
    overflow: hidden;
    position: fixed;
    top: 0;
    width: 100%;
}
    #thumbnails ul {
        margin: 0;
        padding: 0;
    }
    #thumbnails li {
        float: left;
        list-style: none;
        margin: 5px;
        padding: 0;
    }
    #thumbnails a {
        outline: none;
    }
    #thumbnails img {
        width: 112px;
    }
The pointer is placed out of the page. It will be animated at the beginning of the slideshow and moved under the currently displayed slide.
#pointer {
    border: 2px solid #F30;
    cursor: pointer;
    height: 75px;
    left: -100px;
    margin: 3px;
    position: absolute;
    width: 112px;
}
The flash effect is done with a pure white div fixed over the whole screen. By default it is hidden. It will be shown and faded out dynamically.
#flash {
    background: #FFF;
    display: none;
    height: 100%;
    position: fixed;
    width: 100%;
}
The same idea holds for the pause text. It is hidden by default.
#pause {
    display: none;
    font: 100px 'Ultra', arial, serif;
    height: 100%;
    opacity: 0.4;
    position: absolute;
    text-align: center;
    text-shadow: 0 0 5px #000;
    width: 100%;
}
    #pause a {
        color: #FFF;
        height: 100px;
        left: 50%;
        margin: -50px 0 0 -250px;
        position: absolute;
        text-transform: uppercase;
        top: 50%;
        width: 500px;
    }
For the volume links we’ll use some nice icons. The volume button has three states defined by three classes showing different icons. We use the CSS sprites technique to reduce the number of png files loaded. Read more about the CSS image replacement and CSS sprites technique on Css-tricks.
#volume {
    left: 10px;
    opacity: 0.8;
    position: absolute;
    top: 100px;
}
    #volume a {
    	background: transparent url(../img/icons.png) no-repeat;
    	display: block;
    	height: 30px;
    	text-indent: -9999px;
    	width: 30px;
    }
    #volume.all a {
        background-position: 0 0;
    }
    #volume.some a {
        background-position: -30px 0;
    }
    #volume.none a {
        background-position: -60px 0;
    }
Finally, we’ll customize some Vegas default styles to adjust the overlay pattern and the position of the loading indicator.
.vegas-loading {
    top: auto;
    bottom: 40px;
    left: 40px;
}
.vegas-overlay {
    background-image: url(../js/vegas/overlays/02.png);
}
And we’ll also make some adjustments to the jScrollPane default styles in order to get a nice scrollbar fitting our gallery.
.jspHorizontalBar {
    height: 5px;
}
    .jspHorizontalBar .jspTrack {
         background: #333;
    }
    .jspHorizontalBar .jspDrag {
         background: #666;
         cursor: ew-resize;
    }
#thumbnails:hover .jspHorizontalBar .jspDrag {
    background: #F30;
}
The JavaScript
We are reaching the main part: the JavaScript. Let’s start by caching some elements. The picture array will hold all the slides and their title and vertical alignment.
var pictures = [],
    $pointer = $( '#pointer' ),
    $thumbnails = $( '#thumbnails' ),
    $title = $( '#title' ),
    $pause = $( '#pause' ),
    $flash = $( '#flash' ),
    $volume = $( '#volume' );
It’s time to define the sounds of our gallery with Buzz. The HTML5 audio element is now supported by all modern browsers. Sounds are supported in a native way without the need for Flash. Unfortunately, there is not a single audio format supported by all of them. MP3 would have been a good choice, but Firefox doesn’t support it. We have to convert our sounds to several formats. The best combination is OGG and MP3 formats. To convert our audio elements we used the free online file converter Online Convert.
Buzz allows us to group sounds in order to easily control them. This is what we do with all the camera sounds.
If the user’s browser doesn’t support the HTML5 audio element, Buzz degrades properly. In that case, we’ll simply hide the volume button.
The traffic sound is played and looped as soon as it is loaded.
buzz.defaults.formats = [ 'ogg', 'mp3' ];

var trafficSound = new buzz.sound( 'sounds/traffic' ),
    clickSound = new buzz.sound( 'sounds/click' ),
    focusSound = new buzz.sound( 'sounds/focus' ),
    rewindSound = new buzz.sound( 'sounds/rewind' ),
    cameraSounds = new buzz.group( clickSound, focusSound, rewindSound );

if ( !buzz.isSupported() ) {
    $volume.hide();
}
trafficSound.loop().play().fadeIn( 5000 );
Now, let’s work on our thumbnails. We have to adjust the total width of the thumbnails bar. Without this step, the thumbnails would be display in more than one row.
$thumbnails.find( 'ul' ).width( function() {
    var totalWidth = 0;
    $( this ).find( 'li' ).each( function() {
        totalWidth += $( this ).outerWidth( true );
    });
    return totalWidth;
});
We’ll now apply jScrollPane to the thumbnails container. jScrollPane provides an easy way to work with its API. We use that in order to render a proper scrollbar when the window is resized. This API will be useful in a further step.
$thumbnails.jScrollPane();

var jScrollPaneApi = $thumbnails.data( 'jsp' );

$( window ).bind( 'resize', function() {
    jScrollPaneApi.reinitialise();
});
Now, the Vegas plugin needs to be set. We’ll fill the picture array by grabbing some information from the thumbnails list and pass it to Vegas in order to start the slideshow. A four second delay is applied between the slides.
$thumbnails.find( 'a' ).each( function() {
    pictures.push({
        src: $( this ).attr( 'href' ),
        title: $( this ).find( 'img' ).attr( 'title' ),
        valign: $( this ).find( 'img' ).data( 'valign' )
    });
})

$.vegas( 'slideshow', {
    backgrounds: pictures,
    delay: 4000
 })( 'overlay' );
Vegas triggers a bunch of events. The one we need now is the onload event trigger when a slide is loaded and displayed. With the src attribute of the loaded image, we’ll get the number of the currently active thumbnail. Also, a sound is played.
$( 'body' ).bind( 'vegasload', function( e, img ) {
    var src = $( img ).attr( 'src' ),
        idx = $( 'a[href="' + src + '"]' ).parent( 'li' ).index();
    focusSound.play();

    // ...
});
The title is modified in order to hold the picture title and is displayed with a nice fade-out/fade-in effect.
    $title.fadeOut( function() {
        $( this ).find( 'h1' ).text( pictures[ idx ].title );
        $( this ).fadeIn();
    });
The flash is fired…
$flash.show().fadeOut( 1000 );
The pointer has to move over the current thumbnail. The jScrollPane API is used to automatically scroll the bar as the pointer is off the screen, but not if the user hovers over the bar.
    var pointerPosition = $thumbnails.find( 'li' ).eq( idx ).position().left;

    $pointer.animate({
        left: pointerPosition
    }, 500, 'easeInOutBack' );

    if ( ( pointerPosition > $thumbnails.width()
        || pointerPosition < jScrollPaneApi.getContentPositionX() )
        && !$thumbnails.is( ':hover' ) ) {
            jScrollPaneApi.scrollToX( pointerPosition, true );
    }

    $pointer.click( function() {
        $thumbnails.find( 'a' ).eq( idx ).click()
    });
Let’s see what we have to do with our volume button. The idea is to mute or unmute some sounds as the button is clicked. We change the class of the button and set the muting or playing of the sounds accordingly.
$volume.click( function() {
    if ( $( this ).hasClass( 'all' ) ) {
        cameraSounds.unmute();
        trafficSound.mute();

        $( this ).removeClass( 'all' ).addClass( 'some' );
    } else if ( $( this ).hasClass( 'some' ) ) {
        cameraSounds.mute();
        trafficSound.mute();

        $( this ).removeClass( 'some' ).addClass( 'none' );
    } else {
        cameraSounds.unmute();
        trafficSound.unmute();

        $( this ).removeClass( 'none' ).addClass( 'all' );
    }
    return false;
});
Our gallery is almost set. Now we want that clicking a thumbnail displays a new slide and pauses the slideshow. Its cursor is set to the current number of the clicked thumbnail. That way the slideshow will restart at the right position. All the elements of the page are hidden and we display a “paused” message.
Another sound is played.
$thumbnails.find( 'a' ).click( function() {
    $pause.show();
    $pointer.hide();

    $volume.animate( { top: '20px' });
    $thumbnails.animate( { top: '-90px' });
    $title.animate( { bottom: '-90px' });

    var idx = $( this ).parent( 'li' ).index();
    $.vegas( 'slideshow', { step: idx } )( 'pause' );

    rewindSound.play();

    return false;
});
A click on the “paused” word restarts the slideshow and the thumbnails and title are shown again.
$pause.click( function() {
    $pause.hide();
    $pointer.show();

    $volume.animate( { top:'100px' });
    $title.animate( { bottom:'0px' });
    $thumbnails.animate( { top:'0px' });

    $.vegas( 'slideshow' );

    clickSound.play();

    return false;
});
That’s it! We hope you enjoyed the tutorial of mashing up some plugins and like the noisy result!


what a nice effect.. Hmm, i should try this 🙂
It’s a pretty neat slideshow but it goes crazy after 2 minutes on Google Chrome. More specifically, the orange borders of thumbnails go out of control and start to move continuously making impossible to select any thumbnail.
amazing! congrats!!
Very nice effect…
but, why u dont use the correct HTML5 structure to make this?. exemple:
exemple: meta charset=’UTF-8′
Awesome!!!
Like This ^_^
METIN, I can’t reproduce the bug you’re talking about.
ÉDERSON, You’re absolutely right, meta charset=”UTF-8″ would be a better choice. IDE Autocompletion error (doesn’t really support HTML5 syntax yet).
Hi Jay,
Just wondering what the license is for commercial use on this? Looks great!
Not to be a downer, but 5 seconds in that gallery and I want to go nuts. I think less is more. I can appreciate the skill that went into it – but don’t think that it is something I’d want to remain in for very long.
Unfortunately it doesn’t seem to play well in the iPhone, jumps slides etc
Nice 🙂
it’s so heavy, but it’s a rock…hohoho
thanks so much \m/
SEAN MCCORMACK, it’s a tutorial. Grab whatever you want in it (except the pictures).
BO PENTECOST It’s a tutorial. I totally agree, in real life product, looping sounds and music are the worst things on earth.
The best part for me was the audio button to change to only shutter effect on first click and then mute on second. Very nicely done. I just haven’t actually moved to HTML 5 yet. Maybe by next year so more browsers support more of its features.
Yep, as Metin said there’s definitely a bug with Chrome. That orange border goes crazy after some time.
Great.
Very fun!
well done, it looks like a premium script on some marketplace site, thank you
great work..
No bugs on Chrome 12.0.742.112 (Latest stable) Mac.
Doesn’t play audio on latest Safari and iOS browsers 🙁
Don’t play in a IExplorer and Safari =[[ somebody help me??
Quick question, how can I put text in front of every picture when it is moving? Thanks!
Awesome tutorials btw =)
whoops nevermind, I just figured out! Thanks!!!
Your Tutorials are great! let me congratulate you for the god work you are doing, I’m learning a lot with your tutorial guys. Keep the excellent work!!!
I confirm the bug about going crazy after 5 minutes. I tried to debug it but I was unsuccessful. Using Chrome, Firefox, IE, Konqueror, and Android Browser.
Ok, it is kinda of a bug. I just found out. When the tab is not on focus it stops or something, then when you go back to the tab with this slideshow, it doesn’t goes crazy, it tries to catch on or get where it supposed to be.
cool nice work but its not loading in IE,Webpage error details
User Agent: Mozilla/4.0 (compatible; MSIE 8.0; Windows NT 6.1; WOW64; Trident/4.0; GTB7.1; SLCC2; .NET CLR 2.0.50727; .NET CLR 3.5.30729; .NET CLR 3.0.30729; Media Center PC 6.0; InfoPath.2; .NET4.0C; .NET4.0E)
Timestamp: Tue, 20 Sep 2011 20:56:34 UTC
Message: ‘this.sound’ is null or not an object
Line: 94
Char: 13
Code: 0
URI: http://tympanus.net/Tutorials/FullscreenSlideshowAudio/js/buzz/buzz.js
so very nice – will buy you a beer later.
any chance on hooking a specific URL to one picture, so that people can come back to a certain photo they loved so much?
its Amazing:
1000 Thanks.
your tut, my works:
LWmeetsPS:
http://www.deviantart.com/users/outgoing?http://www.lewelsch.ch/Gallery/LWmeetsPS/index.html
PhotoWorks:(no sound)
http://www.deviantart.com/users/outgoing?http://lewelsch.ch/Gallery/PhotoWorks/index.html
Its Amazing, 1000 Thanks.
Your-Tut-My-Works:
LWmeetsPS:
http://www.lewelsch.ch/Gallery/LWmeetsPS/index.html
PhotoWorks( No Sound):
http://lewelsch.ch/Gallery/PhotoWorks/index.html
Hi! How can I stop the slideshow on the begining without interfering with the js files and without mouse click? (I need to stop it on one subpage but any other should still work).
Sorry for my english..
Couldn’t get the audio track to come through to my iPhone (except for the slide changing noise). I’m looking for a HTML5 / jQuery slide show with music player. Any ideas? Thanks!
Great Work. HTML 5 Rocks.
How can I turn off the pattern on the pictures?
I found it!
Thank you it is great!!
1. How or where can I change the transition effect from fade to slide?
I have tried modifying the scripts but haven’t have any success.
Any assistance on this matter would be really appreciate it.
How do you adjust the size of the picture in the gallery.? it is blowing the images up too much.
Genius!
In IE9 work without problem.
Opera everything work expect traffic sound not working. Firefox slide work good but there is no sound.
IE8 nothing work.
I live it look very nice job for ads state or country
I mean I love it
@jaysalvat Thank you for sharing this spiffy slideshow. Helped me understand jQuery so much better, too..!
Kind regards from Amsterdam,
Freek
On Firefox, only the first thumbnail is displayed on first load. After reloading, all thumbnails are visible. Is there anything I may change to get rid of this error?
On Safari, IE9 and Opera everything works well so far.
Similar issue to @Mavo – under Firefox 8.0 – using background slideshow alone without thumbnails, 1st image doesn’t display – appears to be loading, but then 1st image in slideshow is skipped and 2nd image is displayed
For the moment, I’m using a workaround for Firefox with a hidden reload. A “loading”-div is overlaying the slideshow using a higher z-index. If no firefox is used, it is immediately hidden, else the page is reloaded in the background. Using the parameter “fire”, it doesn’t get stuck in a loop.
Code for the header:
jQuery(document).ready(function($){
if (location.href.indexOf(‘fire’)>=0) $(‘#loading’).css(‘visibility’,’hidden’);
if (navigator.userAgent.indexOf(‘Firefox’) ==-1) $(‘#loading’).css(‘visibility’,’hidden’);
$(window).load(function() {
if (navigator.userAgent.indexOf(‘Firefox’) !=-1 && location.href.indexOf(‘fire’)==-1) location.replace(location.href+’?fire’);
});
@Mavo thank you man your jQuery work for me now only problem is make audio work in Firefox
Looks and sounds great, but will it ever work with IE8, and am I the only one who don’t get any sounds on Safari? Chrome and Firefox is working awesomely 😀 Thx for a great tut 😀
Thanks Jay for sharing your great idea… i will try this on my project. Thanks more power!
No sound in Safari Mac 5.1.3
Thanks
Francesco
How to change the audio file???
great.thanks for sharing